Sơ đồ hoạt động

Cấu trúc thư mục project
├───Application
├───bin
├───Controllers
├───Domain
├───Infrastructure
├───k8s
│       backend-deployment.yaml
│       backend-service.yaml
│       ingress.yaml
│       namespace.yaml
│       registry-secret.yaml
├───obj
├───Properties
├───Shared
│   .gitignore
│   appsettings.Development.json
│   appsettings.json
│   Dockerfile
│   Jenkinsfile
│   PKM_Locations.API.csproj
│   PKM_Locations.API.http
│   PKM_Locations.API.sln
│   Program.cs
│   README.md
│   web.config
Giai đoạn 1: Github (Nơi chứa Code), Gitlab làm Repository image
1. Tạo Repository trên github và push code lên
- Truy cập
https://github.com/diendt/pkm_location_api.git(Username:root, Password:BeoBeo..@2025) - Thực hiện clone project từ github về local, copy project vào thư mục và push len github
cd D:\Project\
git clone https://github.com/diendt/pkm_location_api.git
cd pkm_location_api
# Copy code vào thư mục
git add .
git commit -m "Init Project"
git push 
2. Tạo Jenkinsfile (Create Jenkinsfile):
Tạo file mới tên Jenkinsfile
Nội dung file: Jenkinsfile (File 3 – English Comments)
// Jenkinsfile - Simple Deploy to Docker Host (Cách 1: All-in-One)
// Builds production images and runs them on the host Docker daemon.
pipeline {
// Run on the Jenkins controller itself, requires docker-cli installed via Dockerfile
agent any
environment {
// --- Application & Image Naming ---
REGISTRY_URL = "registry.diendo.pro.vn"
REGISTRY_CREDENTIAL = "docker-registry-creds" // ID trùng với Jenkins
REGISTRY_PATH = "beobeo/location_api"
// --- Application & Image Naming ---
APP_NAME = 'location-api' // Base name for images and containers
BACKEND_IMAGE = "${REGISTRY_PATH}/${APP_NAME}-backend:latest" // Image name for backend
BACKEND_CONTAINER = "${APP_NAME}-backend-app" // Fixed container name for backend
// --- Host Port Configuration ---
K8S_CREDENTIAL_ID = 'k8s-config-file' // ID credential kubeconfig
}
stages {
// --- Stage 1: Get latest code ---
stage('1. Checkout Code') {
steps {
// Use Jenkins built-in SCM checkout step
checkout scm
echo "SUCCESS: Code checked out from GitLab."
}
}
// --- Stage 2: Build Production Docker Images ---
stage('2. Build & Push Docker Images') {
parallel {
stage('Backend') {
steps {
script {
withCredentials([usernamePassword(
credentialsId: env.REGISTRY_CREDENTIAL,
usernameVariable: 'REG_USER',
passwordVariable: 'REG_PASS')]
) {
sh '''
echo " Building backend image: ${BACKEND_IMAGE}"
docker build -t ${BACKEND_IMAGE} .
docker tag ${BACKEND_IMAGE} ${REGISTRY_URL}/${BACKEND_IMAGE}
echo "${REG_PASS}" | docker login ${REGISTRY_URL} -u "${REG_USER}" --password-stdin
docker push ${REGISTRY_URL}/${BACKEND_IMAGE}
docker logout ${REGISTRY_URL}
'''
}
}
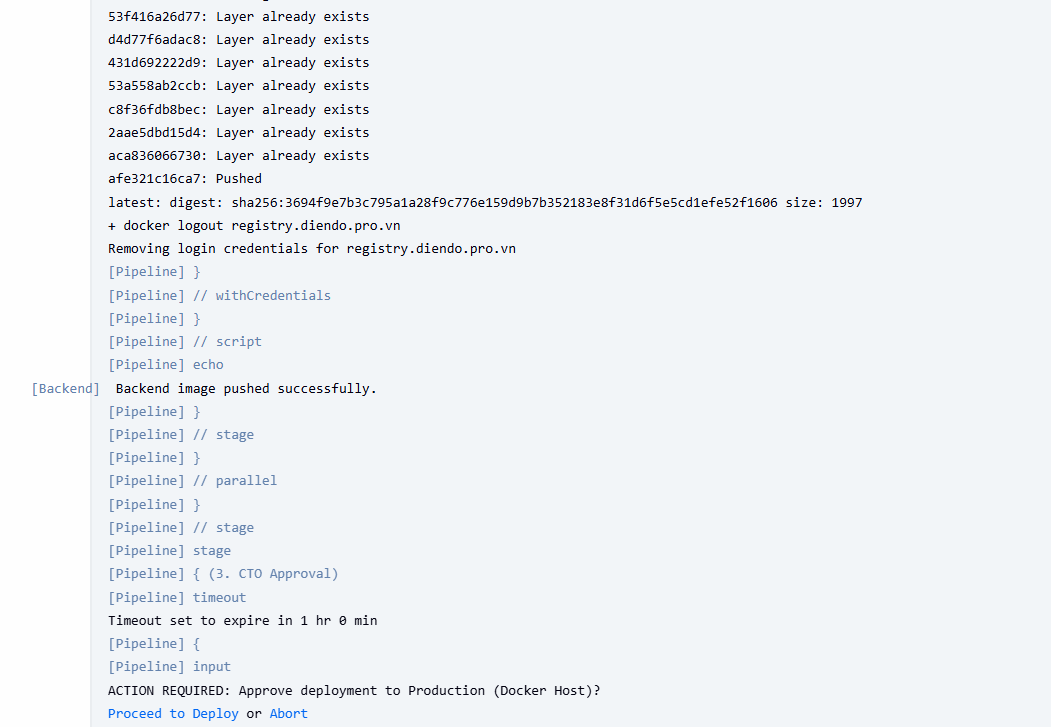
echo " Backend image pushed successfully."
}
}
}
}
// --- Stage 3: Manual Approval Gate ---
stage('3. CTO Approval') {
steps {
// Pause the pipeline, waiting for manual input
timeout(time: 1, unit: 'HOURS') {
input message: 'ACTION REQUIRED: Approve deployment to Production (Docker Host)?',
ok: 'Proceed to Deploy',
submitter: 'cto' // Only user 'cto' can approve
}
}
} // End Stage 3
// --- Stage 4: Deploy Containers to Docker Host ---
stage('4. Deploy to Production (Docker Host)') {
steps {
echo "INFO: Approval received. Deploying containers to Docker Host..."
echo "INFO: Stopping and removing old containers (if they exist)..."
}
} // End Stage 4
} // End of stages
// --- Post-build Actions ---
// Actions to perform after the pipeline finishes
post {
always { // Always run these steps
echo 'INFO: Pipeline finished execution.'
// cleanWs() // Option to clean the Jenkins workspace
}
success { // Run only on success
echo ' SUCCESS: Pipeline completed successfully!'
// Add success notifications (email, Slack, etc.) here
}
failure { // Run only on failure
echo ' FAILED: Pipeline failed!'
// Add failure notifications here
}
} // End of post
} // End of pipeline3. Push Jenkinsfile lên Gitlab
# Stage the new Jenkinsfile
git add Jenkinsfile
# Commit the change
git commit -m "Add Jenkinsfile for Docker host deployment"
# Push to the appropriate branch (e.g., nodejs or main)
git push -u origin
4. Tạo Repo Registry trên gitlab
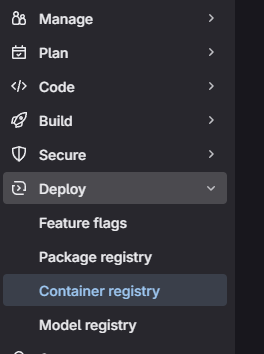
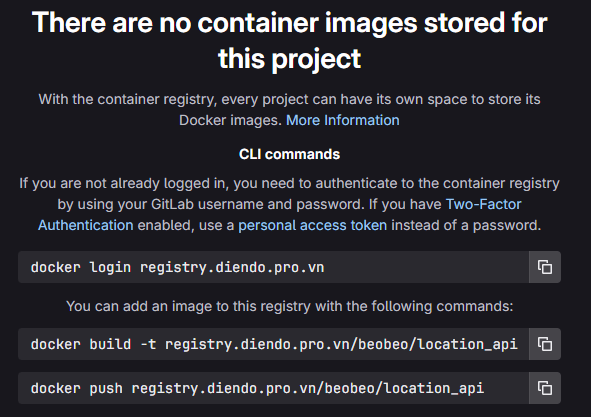
Tạo Project -> New Project -> beobeo/location_api để lưu images, Kiểm tra và lấy đường dẫn của registry Project -> Deploy -> Container Registry
Giai đoạn 2: Jenkins (Nơi Build)
Cấu hình Jenkins để nó “biết” về project và cách thực thi pipeline.
1. Đăng nhập lần đầu & Cài đặt cơ bản:
- Truy cập
https://jenkins.diendo.pro.vn - Lấy mật khẩu admin ban đầu
# Find the Jenkins container ID and print the initial password
docker exec $(docker ps -qf "name=tonytechlab_jenkins") cat /var/jenkins_home/secrets/initialAdminPassword- Hòan thành cài đặt các Plugin cần thiết (
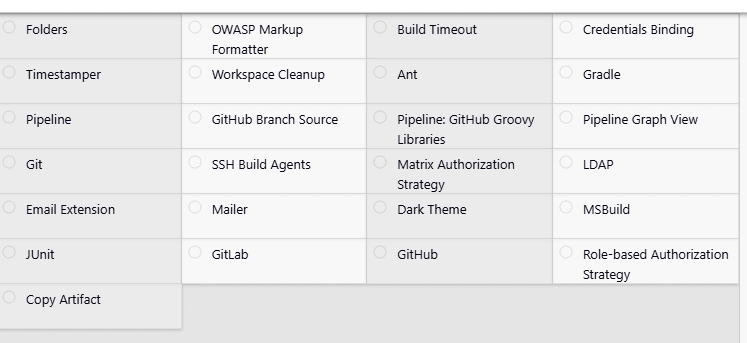
Matrix Authorizatioin Strategy, Gitlab, ...)
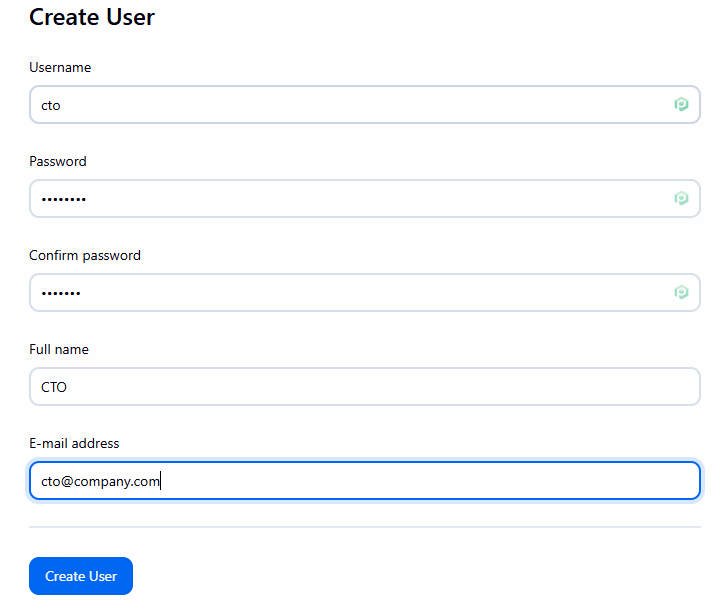
- Tạo user cto, dev: Vào
Manage Jenkins->Sercurity->Manage Users->Create User. Tạo usercto, dev(Password tùy ý)

2. Tạo Personal Access Token trên Github: (Để Jenkins đọc được code)
- Vào Github
User -> Settings
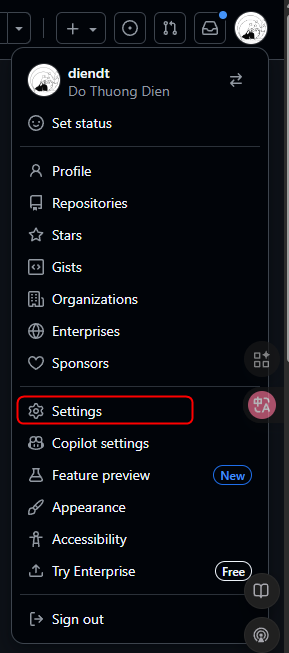
Developer settings
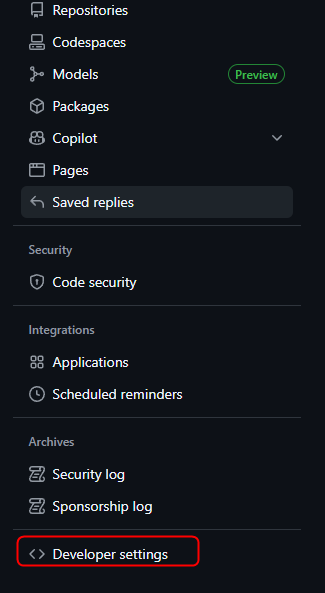
Persional access token -> Tokens -> Generate new token (classic)
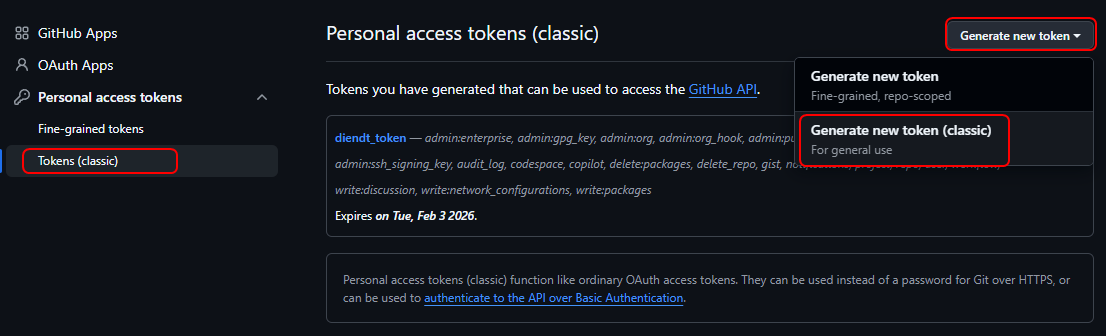
Lưu lại token
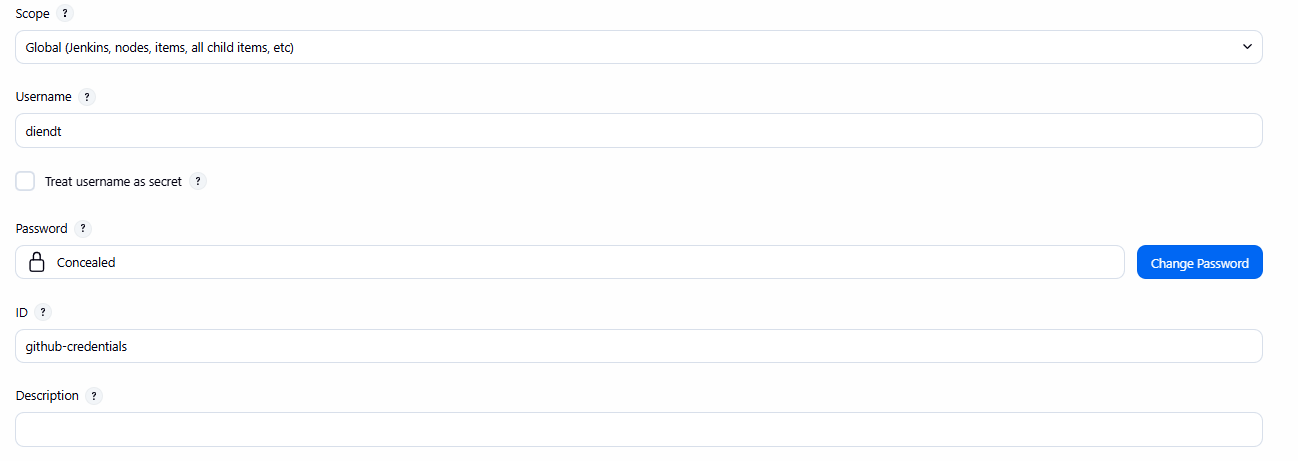
3. Tạo Credentials trên Jenkins
- Vào Jenkins
Manage Jenkins->Security->Credentials->(global). Add Credentials:- Kind:
Username with password - Scope: Global (Jenkins, nodes, items, all child items,etc.
- Username:
<username> - Password:
<Token vừa tạo ở trên> - ID:
github-credentials
- Kind:
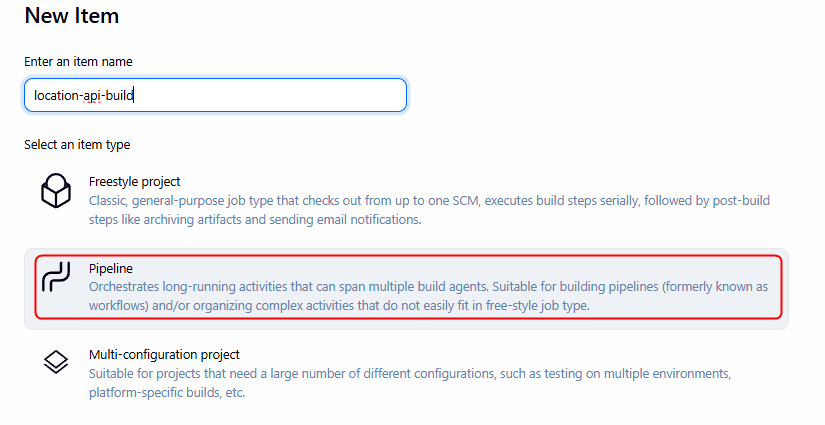
4. Tạo Pipeline Job: (Đây là “Công việc” Jenkins sẽ thực thi)
- Trang chủ Jenkins ->
New Item. - Enter an item name:
location-api-build(Hoặc tên bạn muốn). - Chọn
Pipeline->OK.
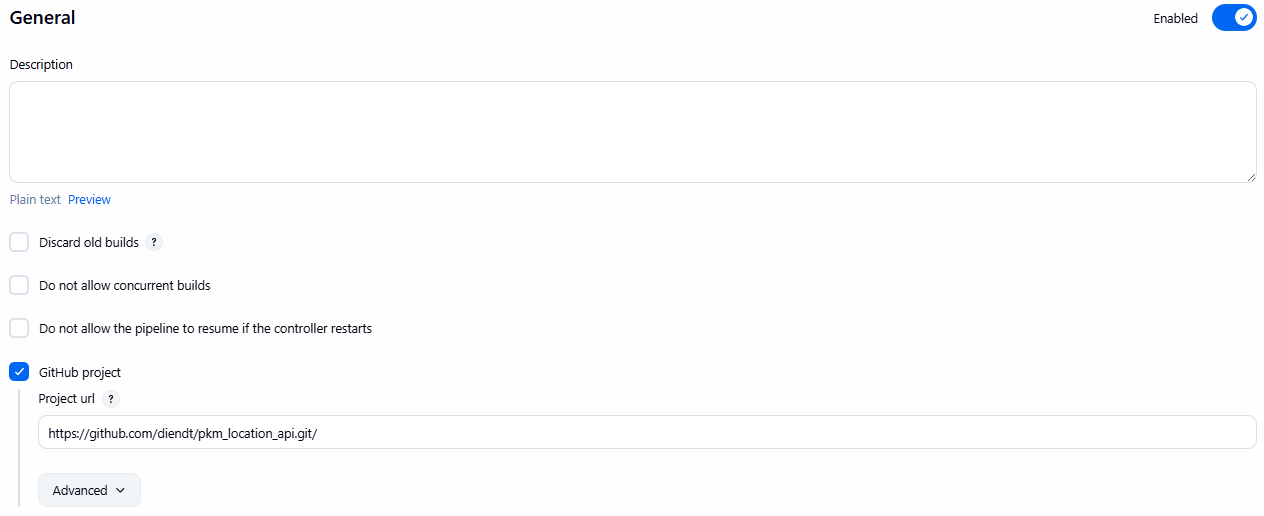
- Tab General:
Tích GitHub project
Project url: https://github.com/diendt/pkm_location_api.git
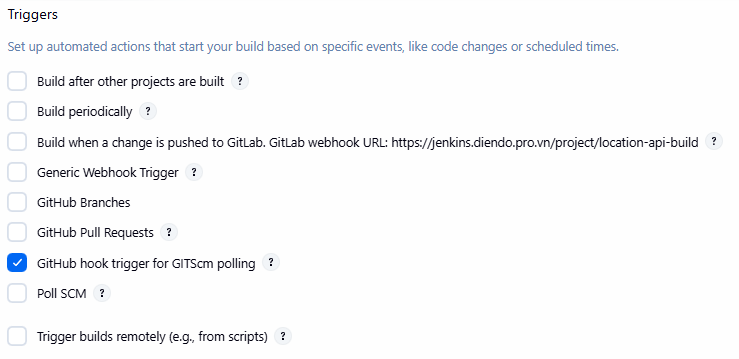
- Tab Trigger
[x] GitHub hook trigger for GITScm polling
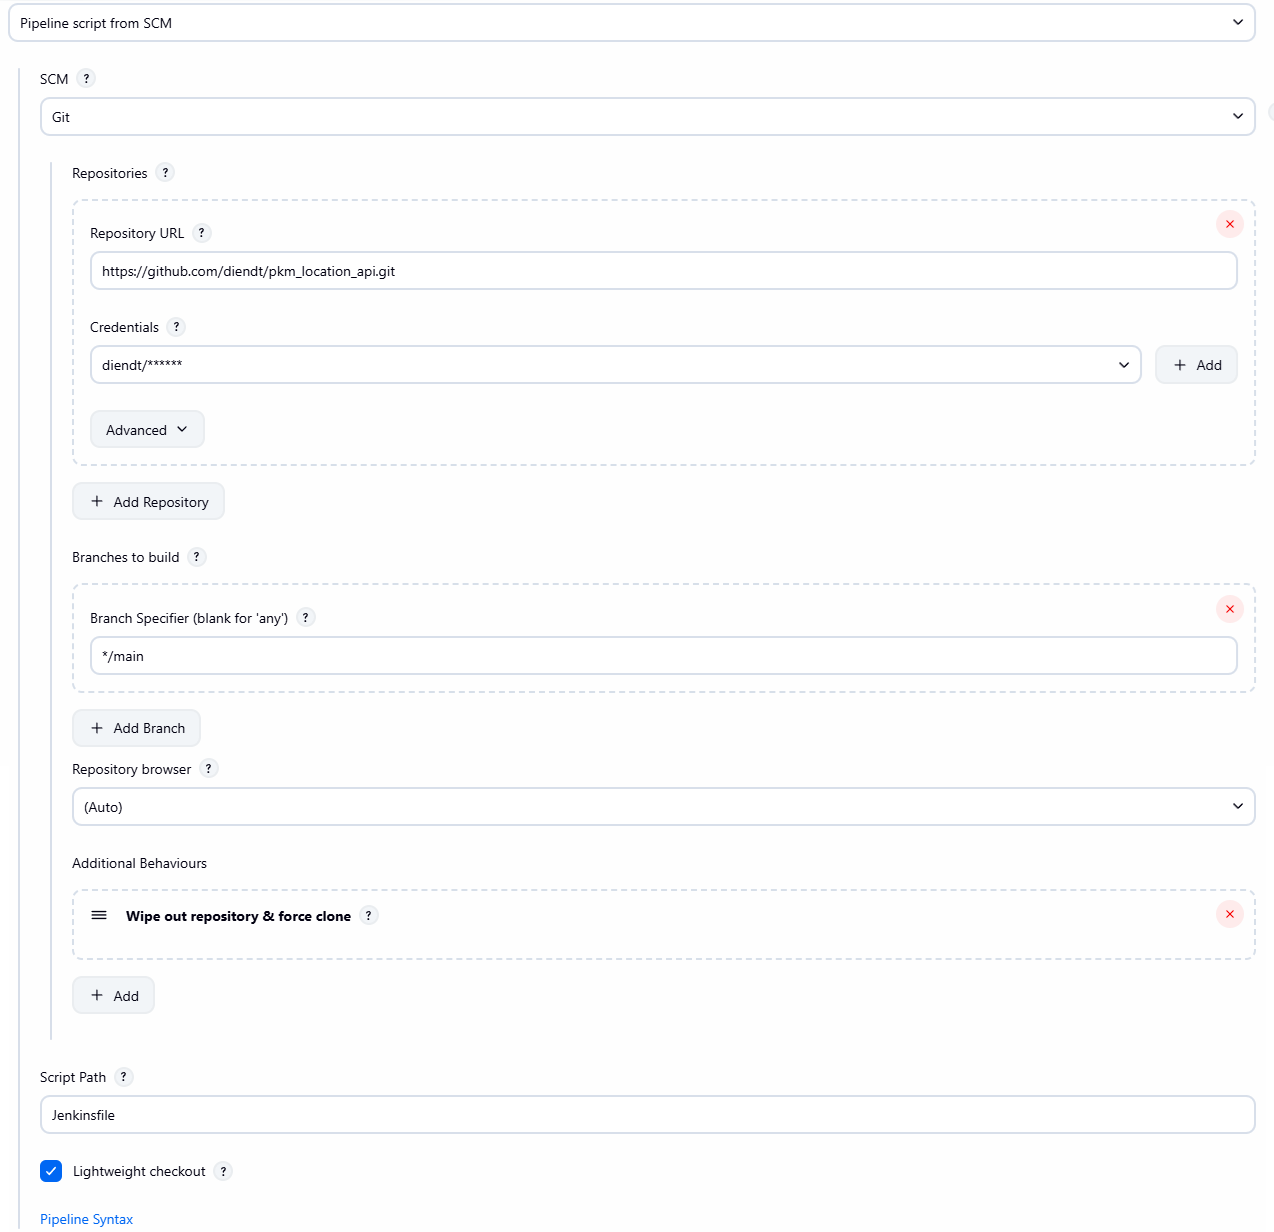
- Tab Pipeline:
- Definition:
Pipeline script from SCM. - SCM:
Git. - Repository URL: https://github.com/diendt/pkm_location_api.git (URL HTTPS của project).
- Credentials: Chọn Credential của đã tạo ở trên
- Branches to build -> Branch Specifier:
*/main(Hoặc nhánh bạn pushJenkinsfilelên). - Script Path:
Jenkinsfile. - **(Quan trọng)** Nhấn
Addbên cạnh Additional Behaviours -> ChọnWipe out repository & force clone.
- Definition:
- Nhấn
Save.
Giai đoạn 3: Kết nối Webhook (Trigger)
Bước này để Github tự động “gọi” Jenkins mỗi khi có code mới được push.
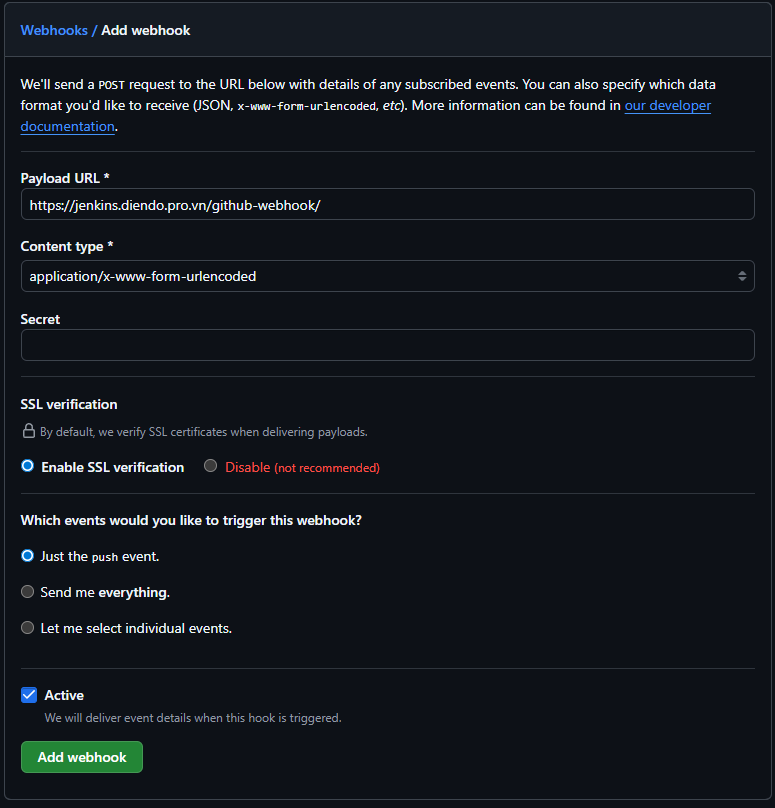
1. Tạo Webhook trên GitHub:
- Trên project của GitHub
Settings -> Webhook->Add webhook
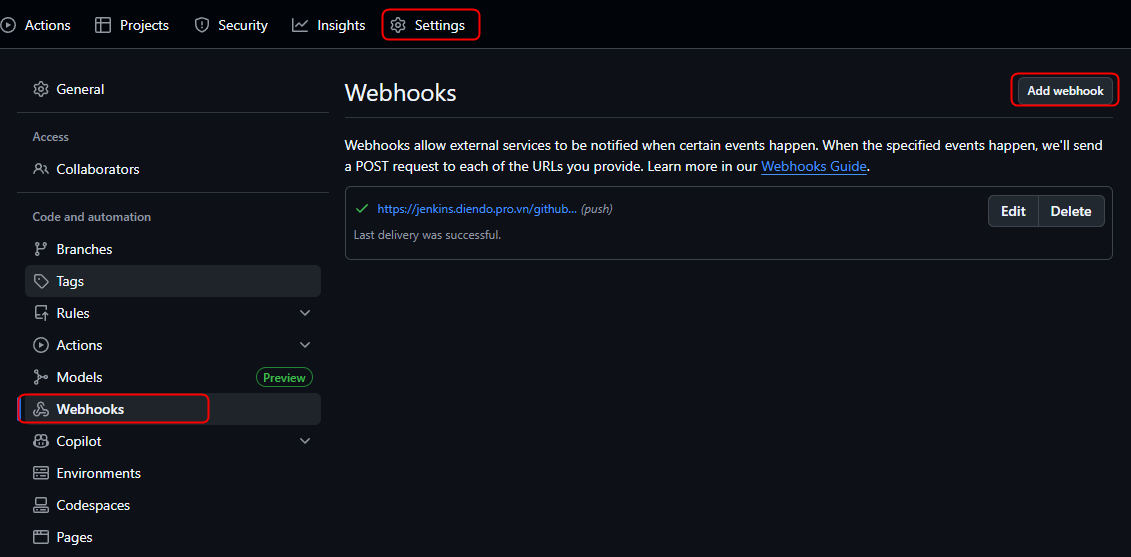
- Payload URL:
https://jenkins.diendo.pro.vn/github-webhook/ - Content type:
application/json - Secret:
- Chọn Just the push event
- Chọn Active
- Bấm Add webhook
Giai đoạn 4: Chạy Thử & Kiểm Tra
Bây giờ, hãy thử nghiệm toàn bộ luồng CI/CD và kiểm tra ứng dụng được deploy.
Developer Push Code:
- Sửa một file bất kỳ trong project
- Chạy các lệnh git:
git add .
git commit -m "Test full pipeline with Docker deploy"
git push origin
Kiểm tra trên github xem đã gừi và nhận thông tin từ jenkins đã thành công chưa.
- Vào
Webhooks -> Edit -> Recent Deliveries
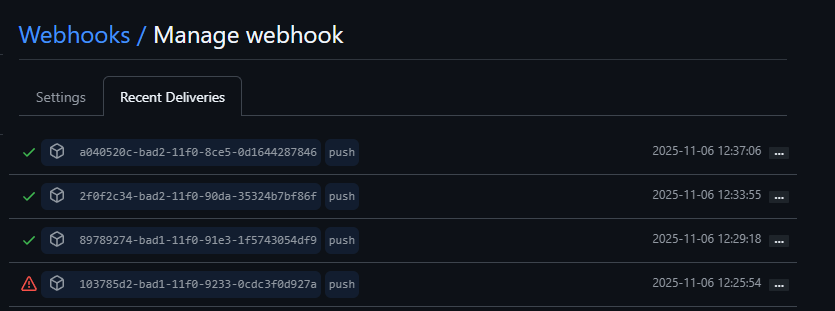
Thấy tick xanh là đã OK
Quan sát Jenkins:
- Mở
https://jenkins.diendo.pro.vn - Job
location-api-buildsẽ tự động chạy. - Nhấn vào job đang chạy. Nó sẽ chạy qua Stage 1, 2 và DỪNG LẠI ở Stage 3 “CTO Approval”.
CTO Phê duyệt (CTO Approval):
- Đăng nhập vào Jenkins bằng user
cto. - Mở job đang tạm dừng.
- Di chuột vào stage “CTO Approval”, nhấn nút
Proceed.

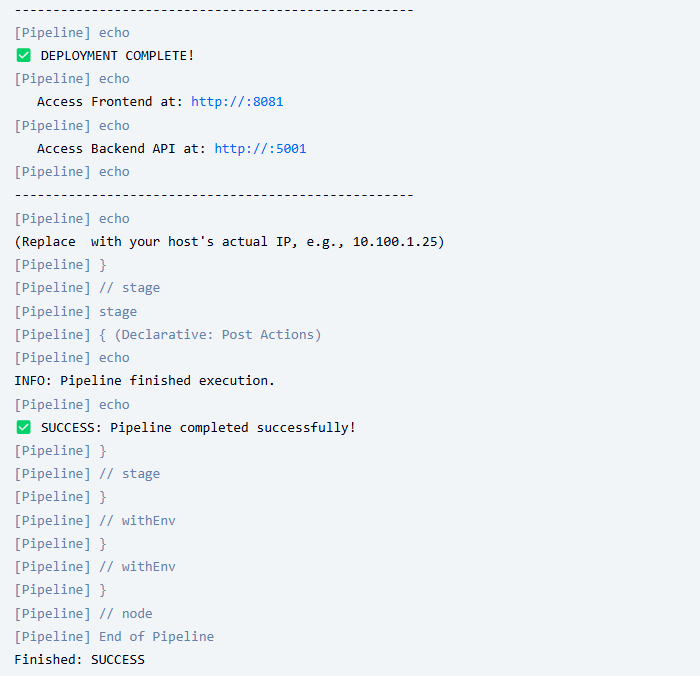
Hoàn tất Deploy & Kiểm tra Ứng dụng:
- Pipeline sẽ tiếp tục chạy Stage 4 (Deploy) và báo
SUCCESS. - Kiểm tra “Console Output” để xem log, đặc biệt là các dòng cuối cùng báo URL truy cập.
Giai đoạn 5: Triển khai lên Kubernetes
Bước 1: Chuẩn bị file Manifest Kubernetes
Bạn cần tạo các file YAML định nghĩa cách ứng dụng chạy trên K8s (Deployment, Service). Tạo một thư mục k8s trong project corejs.
File: k8s/namespace.yaml (Tùy chọn)
apiVersion: v1
kind: Namespace
metadata:
  creationTimestamp: null
  name: pkm-api
File: k8s/registry-secret.yaml (Bắt buộc nếu Registry không public)
K8s cần biết cách login vào GitLab Registry để kéo image.
kubectl create secret docker-registry gitlab-registry-creds \
  --docker-server=registry.diendo.pro.vn \
  --docker-username=root \
  --docker-password=glpat-fQhBFJ54AzG1cg \
  --namespace=pkm-api \
  --dry-run=client -o yaml > k8s/registry-secret.yaml
File registry-secret.yaml sẽ được tạo ra.
apiVersion: v1
data:
  .dockerconfigjson: eyJhdXRocyI6eyJyZWdpc3RyeS5kaWVuZG8ucHJvLnZuIjp7InVzZXJuYW1lIjoicm9vdCIsInBhc3N3b3JkIjoiZ2xwYXQtZlFoQkZKNTRBekcxY2dJd202S1QxRzg2TVFwMU9qVUguMDEuMHcxaHZzcWY3IiwiYXV0aCI6ImNtOXZkRHBuYkhCaGRDMW1VV2hDUmtvMU5FRjZSekZqWjBs
kind: Secret
metadata:
  creationTimestamp: null
  name: gitlab-registry-creds
  namespace: pkm-api
type: kubernetes.io/dockerconfigjson
File: k8s/backend-deployment.yaml
apiVersion: apps/v1
kind: Deployment
metadata:
  name: location-api
  namespace: pkm-api
spec:
  replicas: 1
  selector:
    matchLabels:
      app: location-api
  template:
    metadata:
      labels:
        app: location-api
    spec:
      imagePullSecrets:
        - name: location-api-secret
      containers:
        - name: pkm-location-api
          image: registry.perfectkey.vn/pkm/api-locations:latest
          imagePullPolicy: Always
          ports:
            - containerPort: 80
          env:
            - name: ASPNETCORE_ENVIRONMENT
              value: Development
          envFrom:
            - configMapRef:
                name: location-api-config
File: k8s/backend-service.yaml
---
apiVersion: v1
kind: Service
metadata:
name: location-api-nodeport
namespace: pkm-api
spec:
type: NodePort
selector:
app: location-api
ports:
- port: 80
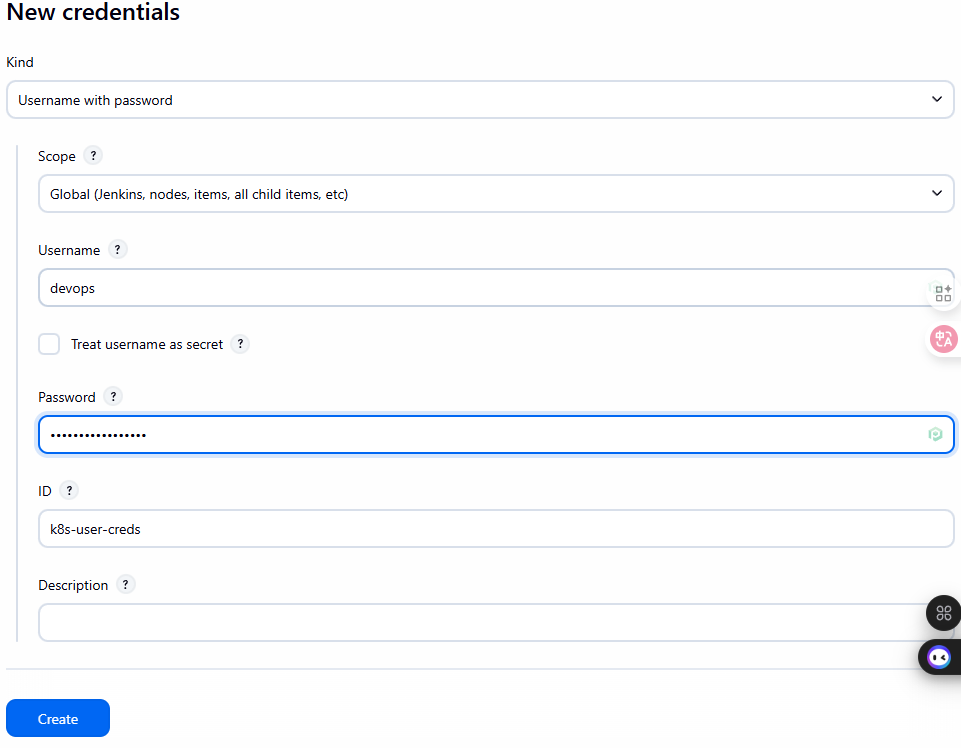
targetPort: 80Bước 2: Tạo K8s Credentials trong Jenkins
Jenkins cần quyền để kết nối và deploy lên cụm K8s.
Cách 1 (Username/Password – Đơn giản nhưng kém an toàn):
- Vào
Jenkins -> Credentials -> (global) -> Add Credentials. - Kind: Username with password.
- Username:
devops - Password:
Password của user - ID:
k8s-user-creds
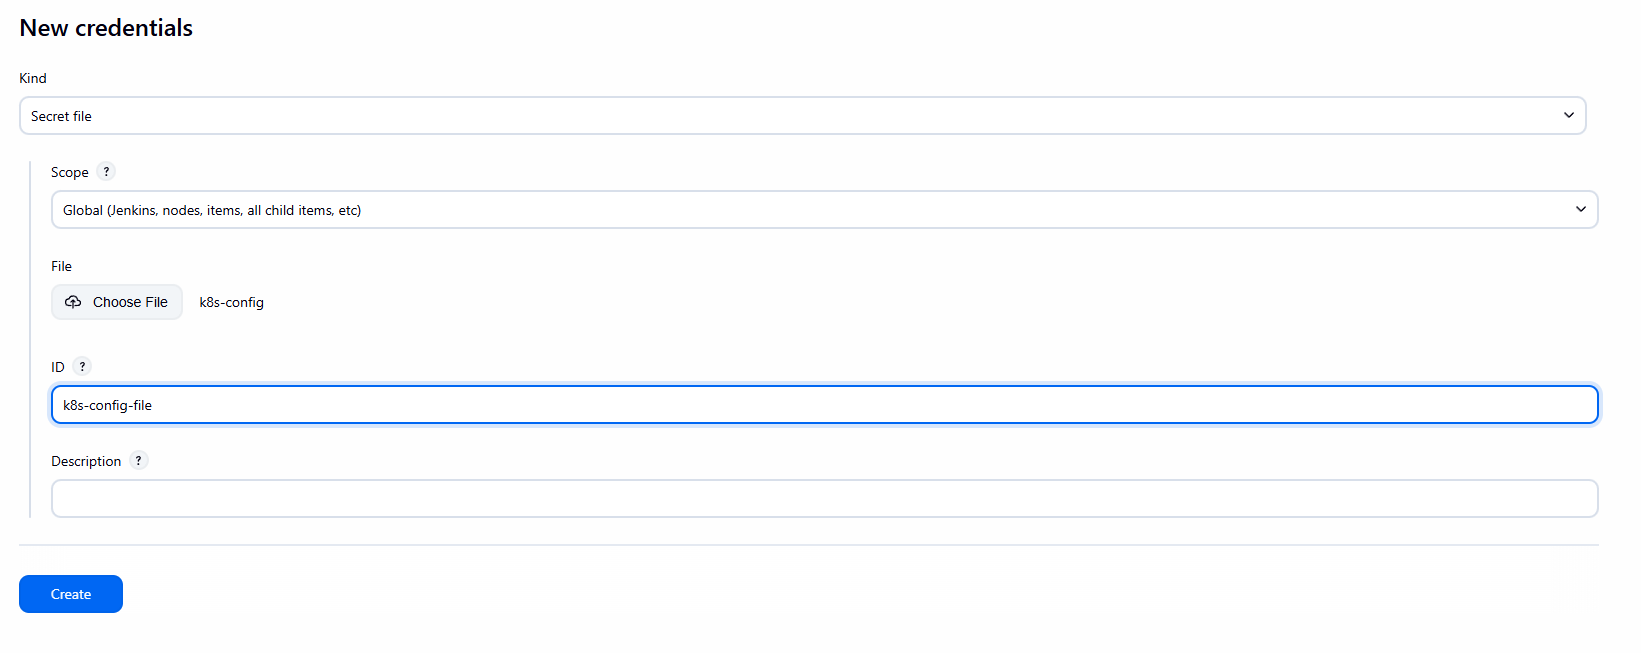
Cách 2 (Kubeconfig – Khuyến nghị):
- SSH vào
k8s-master-1. - Copy nội dung file
~/.kube/config. - Cần phải cài thêm
Kubernetes, KubernetesCLI Pluginsau đó add thêmCredentials - Vào
Jenkins -> Credentials -> (global) -> Add Credentials. - Kind:
Secret file. - Uploadfile config của kụm k8s lên Jenkins
- ID:
k8s-config-file
Lưu ý: Cách dùng Kubeconfig an toàn và linh hoạt hơn. Jenkins Controller cần mount volume /opt/devops/kube/.kube:/root/.kube (như trong docker-compose.yml) để kubectl hoạt động.
Bước 4: Cập nhật Jenkinsfile (Thêm Stage Deploy K8s)
Sửa lại Jenkinsfile trong project corejs.
// Jenkinsfile - Simple Deploy to Docker Host (Cách 1: All-in-One)
// Builds production images and runs them on the host Docker daemon.
pipeline {
// Run on the Jenkins controller itself, requires docker-cli installed via Dockerfile
agent any
environment {
// --- Application & Image Naming ---
REGISTRY_URL = "registry.diendo.pro.vn"
REGISTRY_CREDENTIAL = "docker-registry-creds" // ID trùng với Jenkins
REGISTRY_PATH = "beobeo/location_api"
// --- Application & Image Naming ---
APP_NAME = 'location-api' // Base name for images and containers
BACKEND_IMAGE = "${REGISTRY_PATH}/${APP_NAME}-backend:latest" // Image name for backend
BACKEND_CONTAINER = "${APP_NAME}-app" // Fixed container name for backend
K8S_NAMESPACE = "pkm-api"
K8S_CREDENTIAL_ID = 'k8s-config-file' // ID credential kubeconfig
}
stages {
// --- Stage 1: Get latest code ---
stage('1. Checkout Code') {
steps {
// Use Jenkins built-in SCM checkout step
checkout scm
echo "SUCCESS: Code checked out from GitLab."
}
}
// --- Stage 2: Build Production Docker Images ---
stage('2. Build & Push Docker Images') {
parallel {
stage('Backend') {
steps {
script {
withCredentials([usernamePassword(
credentialsId: env.REGISTRY_CREDENTIAL,
usernameVariable: 'REG_USER',
passwordVariable: 'REG_PASS')]
) {
sh '''
echo " Building backend image: ${BACKEND_IMAGE}"
docker build -t ${BACKEND_IMAGE} .
docker tag ${BACKEND_IMAGE} ${REGISTRY_URL}/${BACKEND_IMAGE}
echo "${REG_PASS}" | docker login ${REGISTRY_URL} -u "${REG_USER}" --password-stdin
docker push ${REGISTRY_URL}/${BACKEND_IMAGE}
docker logout ${REGISTRY_URL}
'''
}
}
echo " Backend image pushed successfully."
}
}
}
}
// --- Stage 3: Manual Approval Gate ---
stage('3. CTO Approval') {
steps {
// Pause the pipeline, waiting for manual input
timeout(time: 1, unit: 'HOURS') {
input message: 'ACTION REQUIRED: Approve deployment to Production (Docker Host)?',
ok: 'Proceed to Deploy',
submitter: 'cto' // Only user 'cto' can approve
}
}
} // End Stage 3
// --- Stage 4: Deploy Containers to Docker Host ---
stage('4. Deploy to Production (Docker Host)') {
steps {
echo "INFO: Approval received. Deploying containers to Docker Host..."
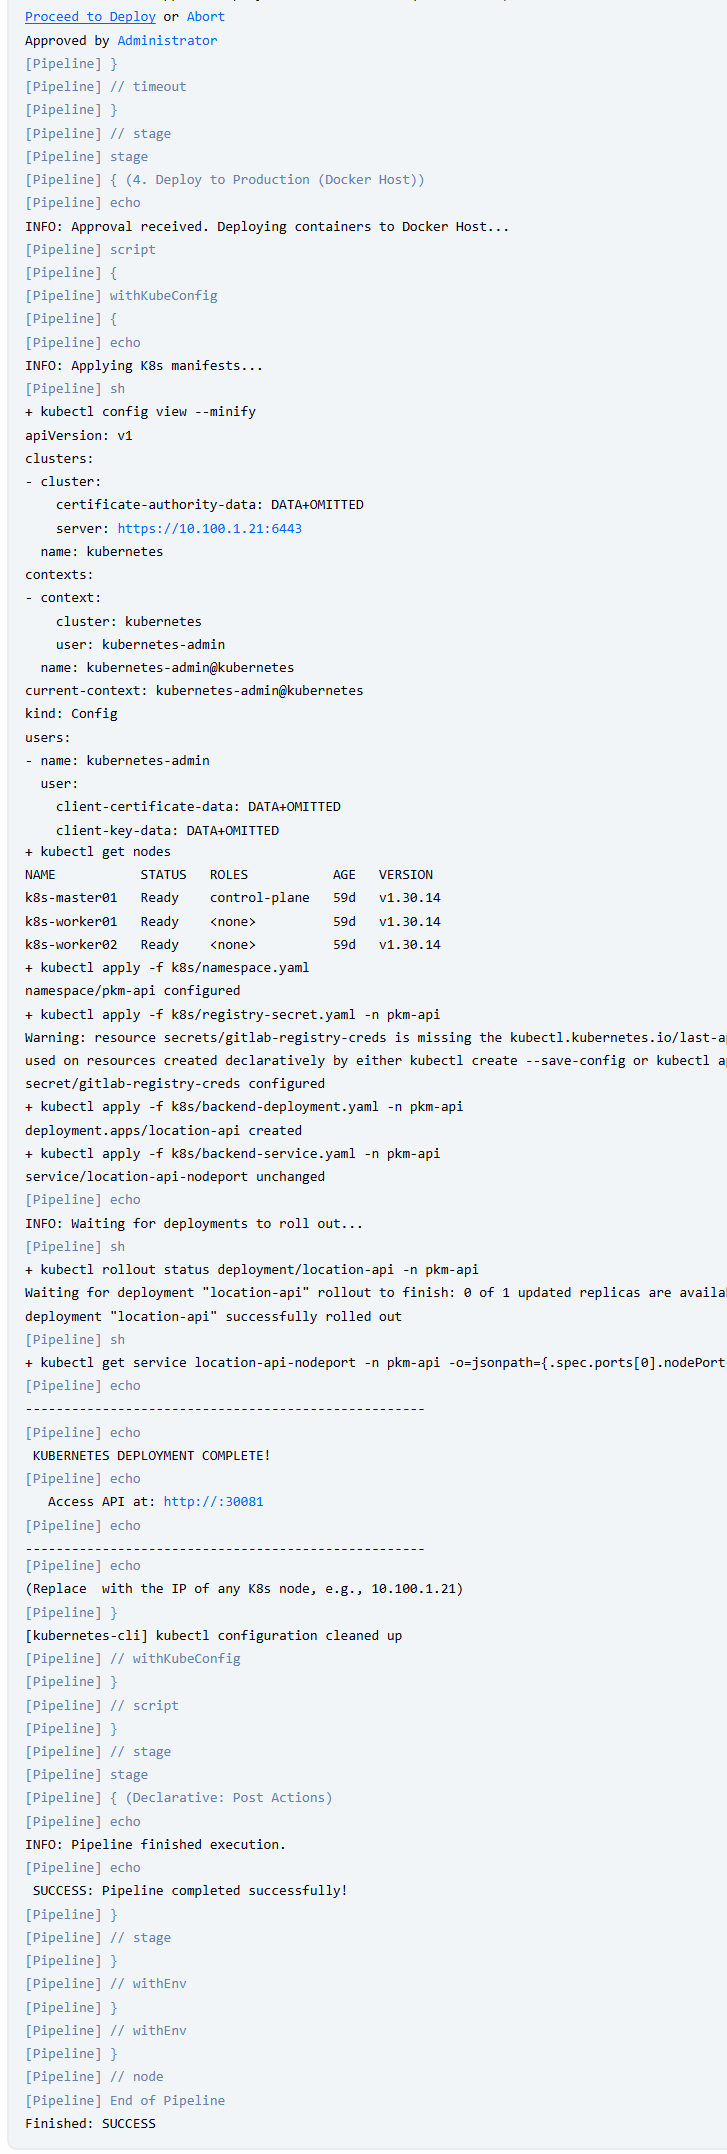
script {
// Sử dụng Kubeconfig credential đã tạo
withKubeConfig(credentialsId: env.K8S_CREDENTIAL_ID) {
echo "INFO: Applying K8s manifests..."
// Chạy kubectl apply cho các file YAML (trong thư mục k8s của repo)
sh """
kubectl config view --minify
kubectl get nodes
kubectl apply -f k8s/namespace.yaml || true
kubectl apply -f k8s/registry-secret.yaml -n ${env.K8S_NAMESPACE} || true
kubectl apply -f k8s/backend-deployment.yaml -n ${env.K8S_NAMESPACE}
kubectl apply -f k8s/backend-service.yaml -n ${env.K8S_NAMESPACE}
"""
echo "INFO: Waiting for deployments to roll out..."
// Chờ deployment hoàn tất
sh "kubectl rollout status deployment/location-api -n ${env.K8S_NAMESPACE}"
// Lấy NodePort của service frontend
def nodePort = sh(
script: "kubectl get service location-api-nodeport -n ${env.K8S_NAMESPACE} -o=jsonpath='{.spec.ports[0].nodePort}'",
returnStdout: true
).trim()
echo "----------------------------------------------------"
echo " KUBERNETES DEPLOYMENT COMPLETE!"
echo " Access API at: http://:${nodePort}"
echo "----------------------------------------------------"
echo "(Replace with the IP of any K8s node, e.g., 10.100.1.21)"
} // end withKubeconfig
} // end script
}
} // End Stage 4
} // End of stages
// --- Post-build Actions ---
// Actions to perform after the pipeline finishes
post {
always { // Always run these steps
echo 'INFO: Pipeline finished execution.'
// cleanWs() // Option to clean the Jenkins workspace
}
success { // Run only on success
echo ' SUCCESS: Pipeline completed successfully!'
// Add success notifications (email, Slack, etc.) here
}
failure { // Run only on failure
echo ' FAILED: Pipeline failed!'
// Add failure notifications here
}
} // End of post
} // End of pipelinePush Jenkinsfile mới và thư mục k8s lên GitLab.
Bước 5: Chạy Pipeline và Truy cập Ứng dụng
Trigger pipeline (push code hoặc Build Now).
Phê duyệt ở Stage 3.
Stage 4 sẽ chạy kubectl apply.
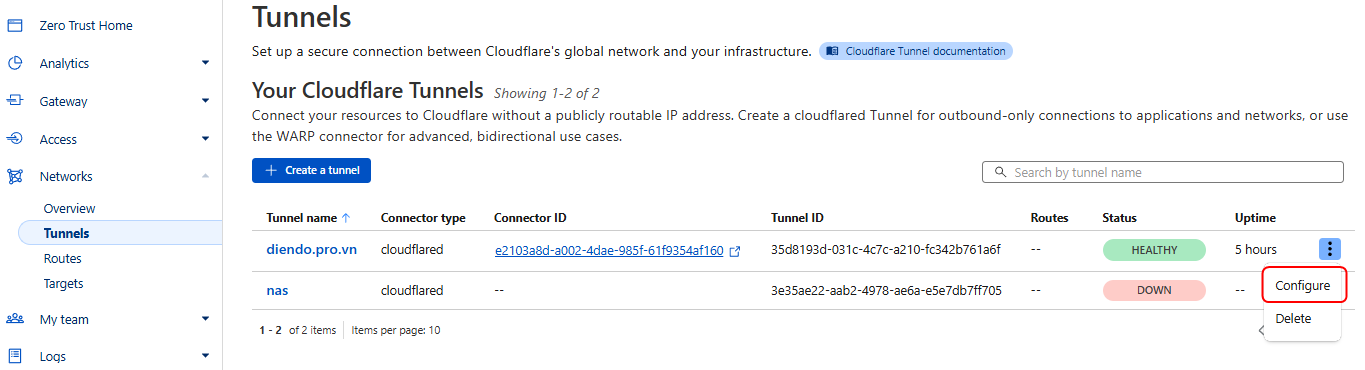
Giai đoạn 6: Public hệ thống qua Zero trust của Cloudflare
Public hệ thống
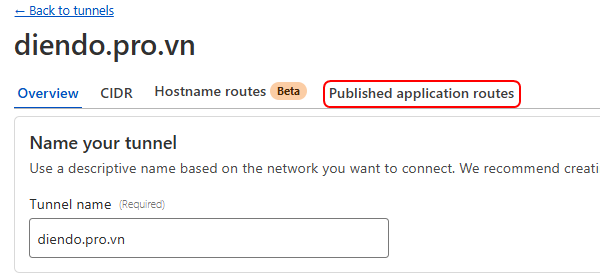
Vảo Network -> Tunnel -> Configure
Chọn Published applcation routes
Add a published application route
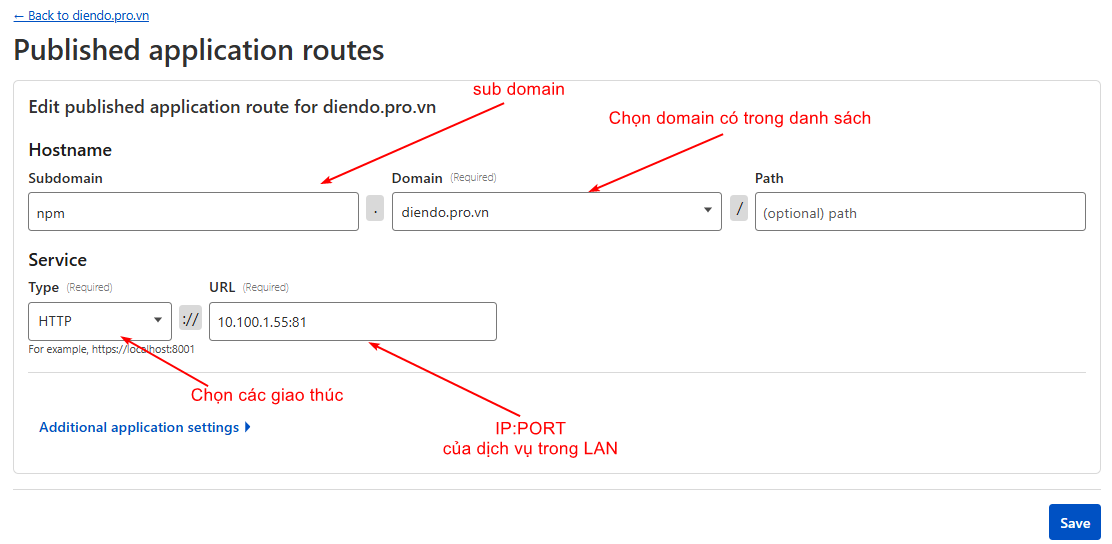
Nhập các thông tin cần thiết và SAVE
published tên miền
– https://api-location.diendo.pro.vn
Kiểm tra thì vào link: https://api-location.diendo.pro.vn/swagger/index.html