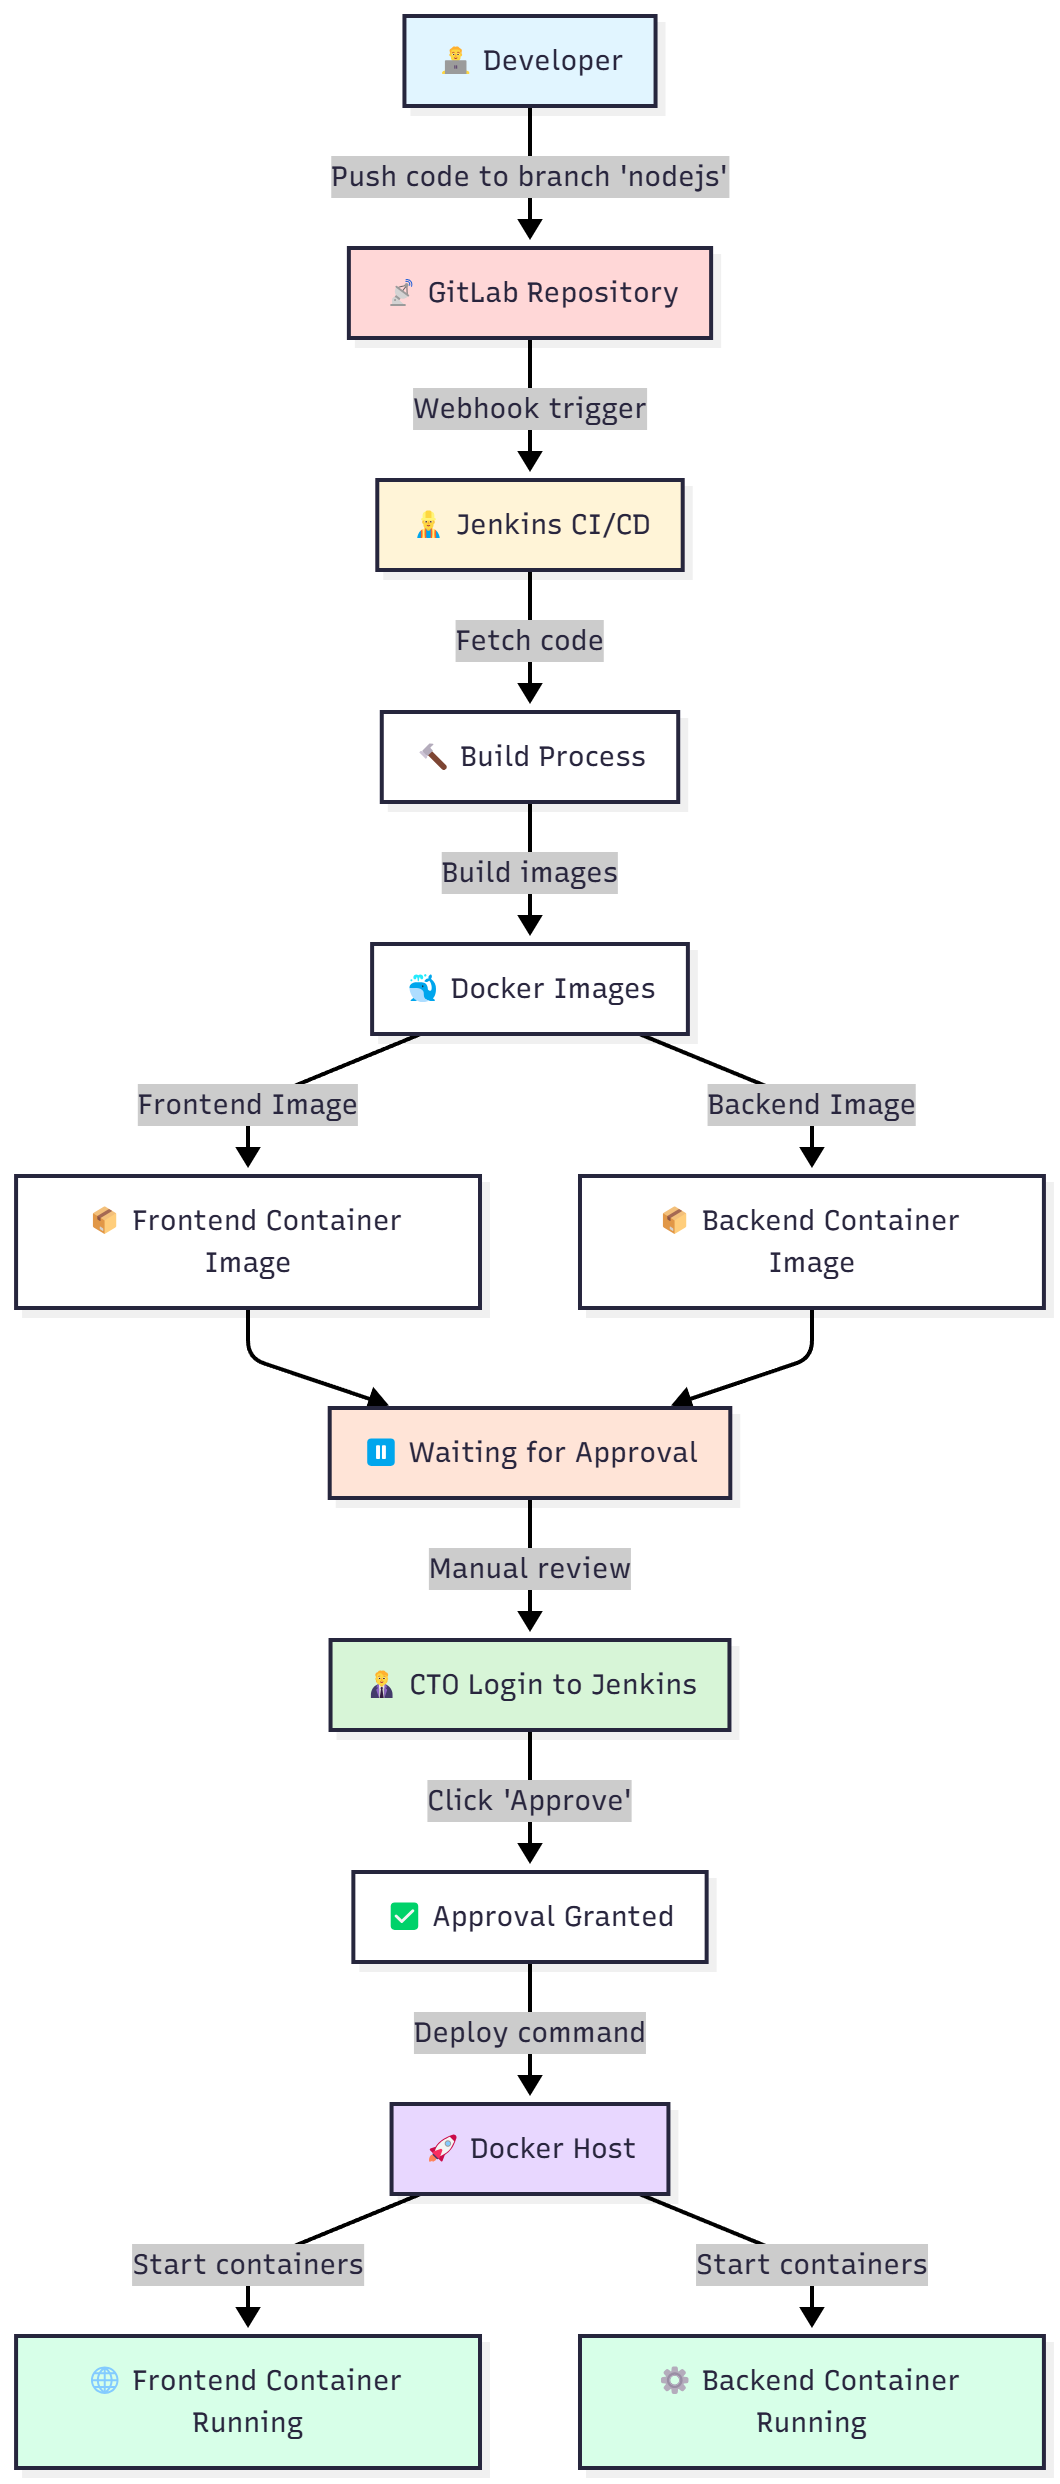
Bài lab này hướng dẫn chi tiết cách xây dựng luồng CI/CD “Cách 1: All-in-One” hoàn chỉnh, deploy ứng dụng (frontend + backend) lên Docker host. Lab này bao gồm cấu hình mạng MACVLAN bền vững, DNS tập trung, Reverse Proxy (NPM) với SSL, và quy trình build/deploy tự động có bước phê duyệt thủ công.
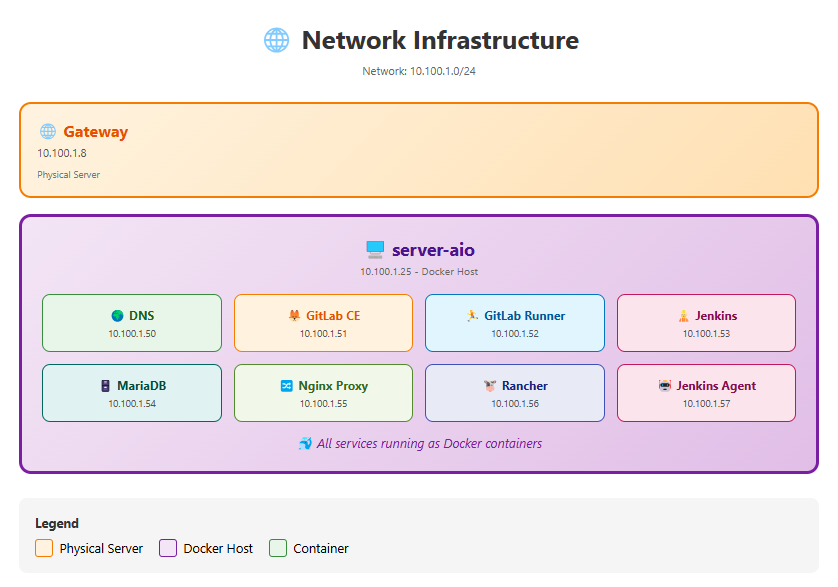
Mô hình hệ thống
Trước khi bắt đầu, hãy tạo một thư mục chính cho dự án trên máy chủ host Linux (máy sẽ chạy docker-compose). Chúng tôi đề xuất sử dụng /opt/tonytechlab/. Đây là cấu trúc bạn cần chuẩn bị:
📂 Cấu trúc Thư mục Chuẩn bị
/opt/devops/
├── docker-compose.yml # (File 1: Xem Bước 3 bên dưới)
│
├── jenkins/
│ └── Dockerfile # (File 2: Xem Bước 2 bên dưới)
│
├── gitlab/ # (Docker sẽ tự tạo khi chạy lần đầu)
│ ├── config/ # Chứa file gitlab.rb quan trọng!
│ ├── data/
│ └── logs/
│
├── npm/ # (Docker sẽ tự tạo)
├── runner-config/ # (Docker sẽ tự tạo)
└── technitium-config/ # (Docker sẽ tự tạo)
🤔 Tại sao lại chọn /opt/devops/? (Why choose /opt/devops/?)
- Quy ước phổ biến (Common Convention): Thư mục
/opt(optional) trong Linux thường dùng cho các ứng dụng “bên thứ ba” hoặc đóng gói. Đặt toàn bộ dự án Docker Compose vào đây giúp tách biệt (isolate) nó khỏi hệ điều hành chính. - Tập trung & Dễ quản lý (Centralized & Manageable): Giữ tất cả các file cấu hình (IaC – Infrastructure as Code) và thư mục dữ liệu (volumes) tại cùng một nơi giúp bạn dễ dàng tìm kiếm, sao lưu, hoặc di chuyển khi cần.
- Các lựa chọn “chuẩn” FHS khác (Advanced FHS Alternatives):
/srv/devops/hoặc tách bạch (config ở/etc,dataở/var/lib). - ⚠️ Tránh dùng (Avoid): Không nên tạo thư mục tùy tiện ở cấp gốc như
/projects/vì nó không theo chuẩn FHS và làm lộn xộn cấu trúc thư mục gốc của hệ điều hành.
Kết luận (Conclusion): Sử dụng/opt/devops/là một lựa chọn tốt, cân bằng giữa tính đơn giản, quy ước phổ biến và dễ quản lý cho bài lab này.
🛠️Giai đoạn 0: Cài đặt Hạ tầng (The Foundation)
Đây là giai đoạn quan trọng nhất, bao gồm cấu hình mạng vật lý ảo (MACVLAN), cài đặt các dịch vụ qua Docker Compose, và cấu hình mạng vĩnh viễn cho máy chủ host để đảm bảo giao tiếp ổn định.
Bước 1: Tạo mạng macvlan (Bắt buộc)
Lệnh này tạo một lớp mạng ảo, cho phép mỗi container có một địa chỉ IP riêng biệt trên mạng LAN của bạn, giống như một máy thật. Chạy lệnh này trên máy chủ host:
docker network create -d macvlan --subnet=10.100.1.0/24 --ip-range=10.100.1.48/28 --gateway=10.100.1.8 -o macvlan_mode=bridge -o parent=ens160 proxy_networkBước 2: Tạo file jenkins/Dockerfile (File 1)
Tạo file tại /opt/devops/jenkins/Dockerfile để cài docker-cli vào Jenkins.
# Start from the official Jenkins LTS image using JDK 17
FROM jenkins/jenkins:lts-jdk17
# Switch to root user to install packages
USER root
# Install prerequisites and Docker GPG key
RUN apt-get update && apt-get install -y ca-certificates curl gnupg
RUN install -m 0755 -d /etc/apt/keyrings
RUN curl -fsSL https://download.docker.com/linux/debian/gpg -o /etc/apt/keyrings/docker.asc
RUN chmod a+r /etc/apt/keyrings/docker.asc
# Add Docker repository
RUN echo \
  "deb [arch=$(dpkg --print-architecture) signed-by=/etc/apt/keyrings/docker.asc] https://download.docker.com/linux/debian \
  $(. /etc/os-release && echo "$VERSION_CODENAME") stable" |
  tee /etc/apt/sources.list.d/docker.list > /dev/null
# Install Docker CLI
RUN apt-get update && apt-get install -y docker-ce-cli
RUN curl -fsSL "https://dl.k8s.io/release/$(curl -L -s https://dl.k8s.io/release/stable.txt)/bin/linux/amd64/kubectl" -o /usr/local/bin/kubectl \
	&& chmod +x /usr/local/bin/kubectl /usr/bin/docker || true \
	&& apt-get clean && rm -rf /var/lib/apt/lists/*
# Switch back to jenkins user
USER jenkins
Bước 3: Tạo file docker-compose.yml (File 2)
Tạo file tại /opt/devops/docker-compose.yaml. Đây là file chính điều phối tất cả các dịch vụ.
version: '3.8'

services:
  # --- SERVICE 1: TECHNITIUM DNS SERVER (IP: .50) ---
  dns-server:
    image: 'technitium/dns-server:latest'
    container_name: dns-server
    hostname: dns.diendo.pro.vn
    restart: always
    ports: ["5380:5380/tcp"] # Web UI
    volumes: ["./technitium-config:/etc/dns"]
    environment: ["TZ=Asia/Ho_Chi_Minh"]
    networks:
      proxy_network: { ipv4_address: 10.100.1.50 }

  # --- SERVICE 2: NGINX PROXY MANAGER (NPM) (IP: .55) ---
  nginx-proxy-manager:
    image: 'jc21/nginx-proxy-manager:latest'
    container_name: nginx-proxy-manager
    restart: always
    ports:
      - '80:80'         # HTTP
      - '81:81'         # Web UI
      - '443:443'       # HTTPS
    environment:
      DB_MYSQL_HOST: "10.100.1.54"
      DB_MYSQL_PORT: 3306
      DB_MYSQL_USER: "npm"
      DB_MYSQL_PASSWORD: "npm_password"
      DB_MYSQL_NAME: "npm_db_1"
    volumes:
      - ./nginx/data:/data
      - ./nginx/letsencrypt:/etc/letsencrypt
    networks:
      proxy_network:
        ipv4_address: 10.100.1.55

  npm-db-1:
    image: 'mariadb:10.5'
    container_name: npm-db-1
    restart: always
    environment:
      MYSQL_ROOT_PASSWORD: 'npm_rootpass'
      MYSQL_DATABASE: 'npm_db_1'
      MYSQL_USER: 'npm'
      MYSQL_PASSWORD: 'npm_password'
    volumes:
      - ./mysql:/var/lib/mysql
    networks:
      proxy_network:
        ipv4_address: 10.100.1.54

  rancher:
    image: rancher/rancher:v2.12.0
    container_name: rancher
    restart: always
    privileged: true
    environment:
      CATTLE_BOOTSTRAP_PASSWORD: "BeoBeo...@2025"
    volumes:
      - ./rancher/data:/var/lib/rancher
    networks:
      proxy_network:
        ipv4_address: 10.100.1.56
    ports:
      - "443:443"

  # --- SERVICE 3: GITLAB-EE (IP: .51) ---
  gitlab:
    image: 'gitlab/gitlab-ee:latest'
    container_name: gitlab
    restart: always
    hostname: 'gitlab.diendo.pro.vn'
    environment:
      GITLAB_OMNIBUS_CONFIG: |
        external_url 'http://gitlab.diendo.pro.vn' # Initial, overridden by gitlab.rb
        gitlab_rails['initial_root_password'] = 'BeoBeo...@2025'
    volumes:
      - './gitlab/config:/etc/gitlab' # Source of Truth for config
      - './gitlab/logs:/var/log/gitlab'
      - './gitlab/data:/var/opt/gitlab'
    shm_size: '256m'
    dns: ["10.100.1.50", "1.1.1.1"] # Use internal DNS
    ports: ['22:22', '5050:5050'] # SSH, Registry internal port
    networks:
      proxy_network: { ipv4_address: 10.100.1.51 }

  # --- SERVICE 4: GITLAB RUNNER (IP: .52) - Optional ---
  gitlab-runner:
    image: 'gitlab/gitlab-runner:latest'
    container_name: gitlab-runner
    privileged: true
    depends_on: [gitlab]
    restart: always
    volumes: ['./runner-config:/etc/gitlab-runner', '/var/run/docker.sock:/var/run/docker.sock'] # SECURITY RISK
    dns: ["10.100.1.50", "1.1.1.1"]
    networks:
      proxy_network: { ipv4_address: 10.100.1.52 }

  # --- SERVICE 5: JENKINS (IP: .53) - All-in-One ---
  jenkins:
    build: { context: ./jenkins } # Use custom Dockerfile
    # container_name removed to fix DNS webhook issue
    restart: unless-stopped
    privileged: true # Insecure: Needed for docker.sock
    user: root       # Insecure: Needed for docker.sock permissions
    volumes:
      - ./kube/.kube:/root/.kube        # Optional K8s config
      - ./kube/.minikube:/root/.minikube # Optional K8s config
      - ./jenkins/jenkins_home:/var/jenkins_home # Persist Jenkins data
      - '/var/run/docker.sock:/var/run/docker.sock' # Insecure: Access host Docker
    dns: ["10.100.1.50", "1.1.1.1"] # Use internal DNS
    networks:
      proxy_network: { ipv4_address: 10.100.1.53 }

# --- GLOBAL NETWORK CONFIGURATION ---
networks:
  proxy_network:
    external: true # Use the pre-created MACVLAN network
Bước 4: Cấu hình Docker Daemon (Trust Registry)
Để Jenkins (và host) có thể docker login/pull/push tới register.tonytechlab.com (qua NPM với SSL), cần cấu hình Docker daemon trên máy chủ host.
Sửa file /etc/docker/daemon.json:
sudo nano /etc/docker/daemon.jsonThêm nội dung sau:
{
  "data-root":"/opt/docker",
  "log-driver": "json-file",
  "log-opts": {
    "max-size": "100m"
  },
  "bip": "172.17.0.1/24",
  "insecure-registries": ["registry.diendo.pro.vn"],
  "dns": ["10.100.1.50", "8.8.8.8"],
  "storage-driver": "overlay2"
}
Khởi động lại Docker daemon:
sudo systemctl restart docker(Tùy chọn) Lặp lại các bước trên cho các Node Kubernetes nếu bạn dùng K8s sau này.
Bước 5: Thiết lập Giao tiếp Host ↔ MACVLAN (Vĩnh viễn bằng NetworkManager)
Đây là bước bứt phá và quan trọng nhất để máy chủ host có thể “nói chuyện” với container. Chúng ta dùng nmcli (NetworkManager) vì đây là cách đã được xác nhận hoạt động ổn định trên môi trường host của bạn.
Đảm bảo NetworkManager đang chạy:
Chúng ta cần tắt systemd-networkd (nếu đang chạy) và bật NetworkManager.
# Stop and disable systemd-networkd to avoid conflicts
sudo systemctl stop systemd-networkd || true
sudo systemctl disable systemd-networkd || true
# Enable and start NetworkManager
sudo systemctl enable NetworkManager
sudo systemctl start NetworkManager
sudo systemctl status NetworkManager # Output should show 'active (running)'
Tạo Kết nối MACVLAN ảo (macvlan-host):
Lệnh này tạo một interface ảo trên host có IP: 10.100.1.49 để làm “cầu nối” giao tiếp.
# Add a new macvlan connection profile
sudo nmcli connection add type macvlan \
  con-name macvlan-host-con \
  dev ens160 \
  mode bridge \
  ifname macvlan-host \
  ipv4.method manual \
  ipv4.addresses 10.100.1.49/28 \
  connection.autoconnect yes
Thêm Route Tĩnh (Chỉ cho Container IPs):
Ra lênh cho host biết đường đi đến từng container qua IP ảo: 10.100.1.49
# Add static routes, modifying the 'macvlan-host-con' profile
# Note: The '+' adds this route without overwriting existing ones.
# Format: +ipv4.routes "destination/mask gateway"

sudo nmcli connection modify macvlan-host-con +ipv4.routes "10.100.1.48/28 10.100.1.49"
Kích hoạt Kết nối Mới:
# Reload all connection profiles from disk
sudo nmcli connection reload
# Bring up (activate) the new macvlan connection
sudo nmcli connection up macvlan-host-con
Kiểm tra Interface & Route (Quan trọng):
ip a show macvlan-host
ip route

default via 10.100.1.8 dev ens160 proto static metric 100
10.100.1.0/24 dev ens160 proto kernel scope link src 10.100.1.25 metric 100
10.100.1.48/28 dev macvlan-host proto kernel scope link src 10.100.1.49 metric 410
172.17.0.0/24 dev docker0 proto kernel scope link src 172.17.0.1 linkdown
Từ host ping và các IP bên trong container
root@srv025-aio:~# ping 10.100.1.50 -c 3
PING 10.100.1.50 (10.100.1.50) 56(84) bytes of data.
64 bytes from 10.100.1.50: icmp_seq=1 ttl=64 time=0.062 ms
64 bytes from 10.100.1.50: icmp_seq=2 ttl=64 time=0.060 ms
64 bytes from 10.100.1.50: icmp_seq=3 ttl=64 time=0.061 ms
Bước 6: Cấu hình DNS Server (Host OS) – (Giải pháp “Bứt phá”)
Đảm bảo Host OS dùng Technitium DNS. Do systemd-resolved (stub 127.0.0.53) gây ra lỗi NXDOMAIN ngay cả khi đã có route, chúng ta sẽ sử dụng phương pháp “bứt phá” để cấu hình DNS vĩnh viễn.
Giải pháp: Tắt systemd-resolved và dùng /etc/resolv.conf tĩnh
Cách này buộc hệ thống host Linux phải hỏi thẳng Technitium DNS (10.100.1.50) thay vì đi qua stub resolver (127.0.0.53), giải quyết triệt để lỗi NXDOMAIN mà bạn gặp phải.
Tắt và Vô hiệu hóa systemd-resolved:
# Dừng dịch vụ ngay lập tức
sudo systemctl stop systemd-resolved
# Ngăn nó khởi động lại cùng máy
sudo systemctl disable systemd-resolved
Xóa Symlink /etc/resolv.conf:
File /etc/resolv.conf hiện tại là file “ảo”. Chúng ta cần xóa nó.
# Xóa file symlink
sudo rm /etc/resolv.conf
Tạo file /etc/resolv.conf MỚI (File thật):
Tạo một file /etc/resolv.conf mới và thật:
sudo nano /etc/resolv.confDán nội dung sau vào file. Đây là cấu hình DNS “cổ điển” và đáng tin cậy:
# DNS Server chính là Technitium
nameserver 10.100.1.50

# DNS dự phòng (Google)
nameserver 8.8.8.8

# Tên miền tìm kiếm mặc định
search diendo.name.vn
Lưu file và Khởi động lại Mạng:
# Khởi động lại NetworkManager để đảm bảo nó nhận file resolv.conf mới
sudo systemctl restart NetworkManager
Kiểm tra DNS Resolution trên Host (Quan trọng):
# Kiểm tra nội dung file config
cat /etc/resolv.conf
nslookup google.com
Server: 10.100.1.50
Address: 10.100.1.50#53
Non-authoritative answer:
Name: google.com
Address: 142.250.198.46
Name: google.com
Address: 2404:6800:4005:826::200eDNS hiện tại được dùng là 10.100.1.50
Bước 7: Khởi chạy lần đầu & Cấu hình gitlab.rb
Chạy lần đầu để GitLab tạo file cấu hình mẫu, sau đó chúng ta sẽ sửa nó theo kiến trúc 3 tên miền.
Chạy Lần đầu (Run First Time):
Khởi động tất cả các dịch vụ (build image Jenkins nếu là lần đầu):
# Ensure you are in /opt/devops/
docker-compose up -d --build --force-recreate
Chờ khoảng 1-2 phút cho thư mục ./gitlab/config/gitlab.rb được tạo ra.
🤔 Phương pháp Cấu hình Tối ưu cho GitLab (Optimal GitLab Configuration Method)
Chúng ta sử dụng file gitlab.rb để quản lý cấu hình GitLab. Cách này tránh lỗi “config cũ” và dễ quản lý hơn trong dài hạn.
Quy trình: Chạy docker-compose up lần đầu để GitLab tạo file gitlab.rb mẫu -> Sửa file gitlab.rb này -> Chạy docker exec -it gitlab gitlab-ctl reconfigure để áp dụng.
Sửa file gitlab.rb trên Host:
Mở file ./gitlab/config/gitlab.rb. Tìm và sửa các khối sau cho chính xác (bỏ comment # và sửa giá trị).
# --- Block 1: Web & SSH Config ---
# Ensure external_url uses HTTPS and the correct web domain (proxied by NPM).
external_url 'https://gitlab.diendo.pro.vn'
# Set the dedicated SSH domain (points directly to GitLab container).
gitlab_rails['gitlab_ssh_host'] = 'ssh.gitlab.diendo.pro.vn'
# Port 22 is the default for SSH, so no need to uncomment/set gitlab_shell_ssh_port

# --- Block 2: Registry Service Config ---
# Set the external URL for the registry (users will use this via NPM).
registry_external_url 'https://registry.diendo.pro.vn'
# Disable the registry's internal Nginx, as NPM handles SSL/proxying for the registry.
registry_nginx['enable'] = false
# Enable the actual registry service within GitLab.
registry['enable'] = true
# The internal port the registry service listens on (NPM forwards traffic to this port).
registry['port'] = 5050
# Ensure the registry listens on all network interfaces inside the container on the specified port.
registry['registry_http_addr'] = "0.0.0.0:5050"
gitlab_rails['registry_api_url'] = "http://localhost:5050"
# --- Block 3: App-to-Registry Connection ---
# Tell the main GitLab application (Rails web interface) that the registry is enabled.
gitlab_rails['registry_enabled'] = true
# Tell the Rails app which HOSTNAME to use when it needs to communicate with the registry
# (e.g., to display tags in the UI). It should use the public NPM hostname.
gitlab_rails['registry_host'] = "registry.diendo.pro.vn"
# Tell the Rails app which PORT to use when communicating with the registry host
# (it communicates via NPM's HTTPS port).
gitlab_rails['registry_port'] = "443"
# The internal filesystem path where registry data (Docker image layers) is stored
# within the '/var/opt/gitlab' volume. Make sure this line is uncommented.
gitlab_rails['registry_path'] = "/var/opt/gitlab/gitlab-rails/shared/registry"

# --- Block 4: Force Internal Nginx to HTTP ---
# Force the main internal Nginx (serving the web UI) to listen only on HTTP,
# even though external_url is HTTPS. NPM handles the external HTTPS.
nginx['listen_https'] = false
# You might also explicitly set the HTTP port if needed, but 80 is default.
# nginx['listen_port'] = 80
Áp dụng Cấu hình (Apply Configuration – Reconfigure):
Ra lệnh cho container GitLab đọc file gitlab.rb bạn vừa sửa và áp dụng các thay đổi:
# Execute the reconfigure command inside the running gitlab container
docker exec -it gitlab gitlab-ctl reconfigure
Chờ vài phút cho lệnh này chạy xong. Nó sẽ khởi động dịch vụ Registry và cập nhật cấu hình SSH/Nginx.
Bước 8: Cấu hình Mạng (DNS và NPM)
Thiết lập hệ thống phân giải tên miền (DNS) và Reverse Proxy (NPM) để các dịch vụ có thể truy cập qua tên miền đẹp và bảo mật (HTTPS).
1. Technitium DNS (http://10.100.1.50:5380):
Tạo Zone diendo.pro.vn (nếu chưa có)
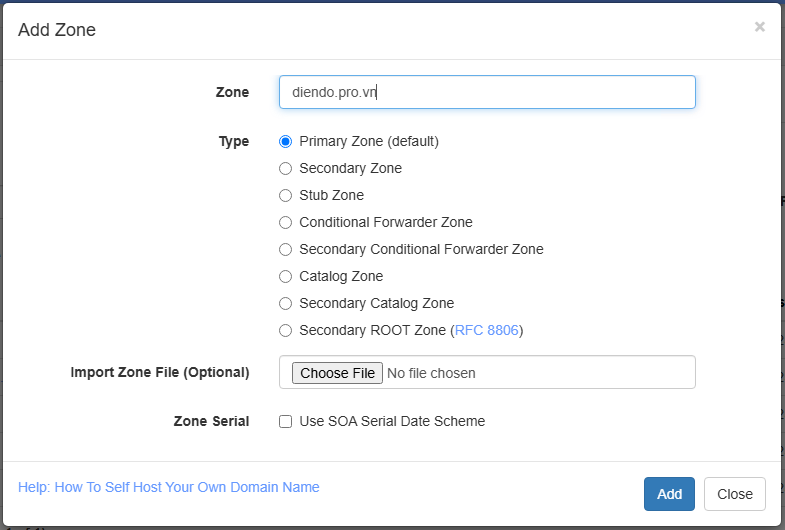
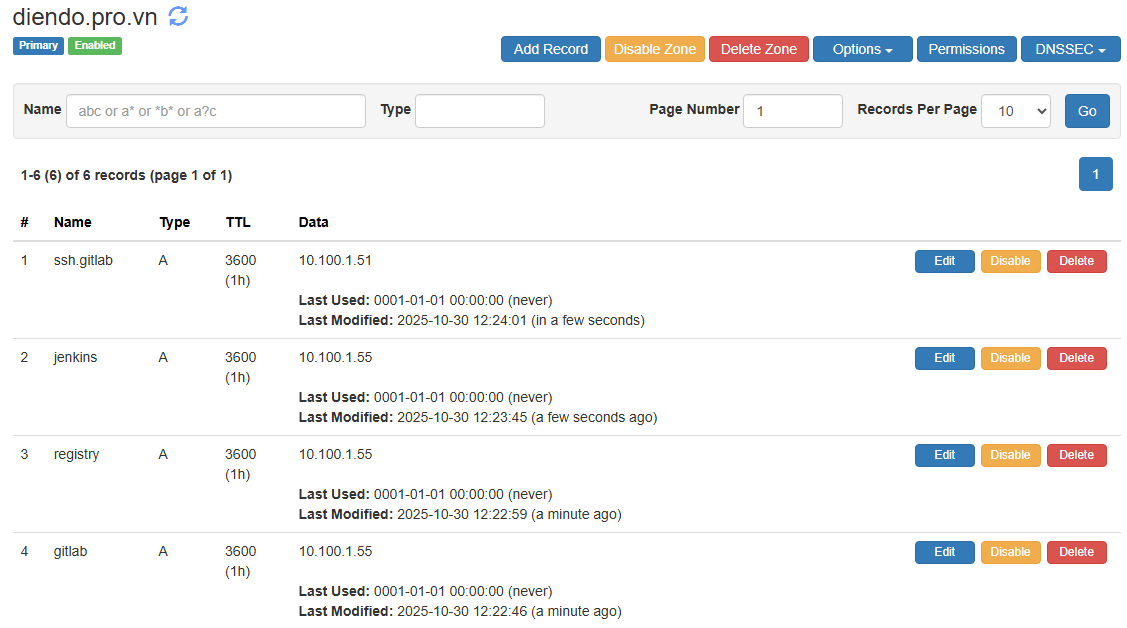
Tạo 4 bản ghi A:
gitlab.diendo.pro.vn➡️10.100.1.55(Trỏ về NPM)registry.diendo.pro.vn➡️10.100.1.55(Trỏ về NPM)ssh.gitlab.diendo.pro.vn➡️10.100.1.51(Trỏ thẳng vào GitLab)jenkins.diendo.pro.vn➡️10.100.1.55(Trỏ về NPM)
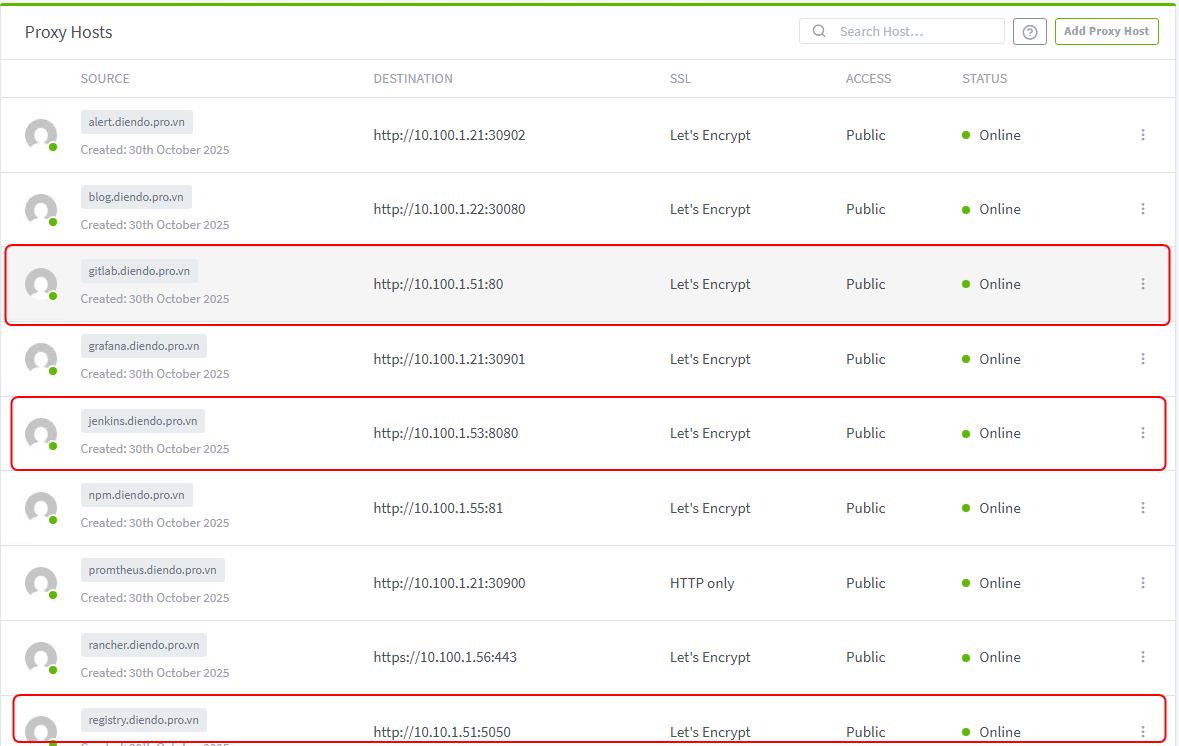
2. Nginx Proxy Manager (http://10.100.1.55:81):
Đăng nhập lần đầu với username: [email protected] và password: changeme (mặc định và sau đó đổi email và mật khẩu)
Tạo 3 Proxy Hosts:
Host 1 (GitLab Web): Domain gitlab.diendo.pro.vn➡️ Forward http://10.100.1.51:80
Host 2 (GitLab Registry): Domain register.diendo.pro.vn ➡️ Forward http://10.10.1.51:5050
Host 3 (Jenkins): Domain jenkins.diendo.pro.vn➡️ Forward http://10.100.1.53:8080 (Tích Websockets Support).
Vào tab SSL cho cả ba host, yêu cầu chứng chỉ (ví dụ: Let’s Encrypt) và bật Force SSL.
✅ Kiểm tra sau Bước 9 (Check after Step 9):
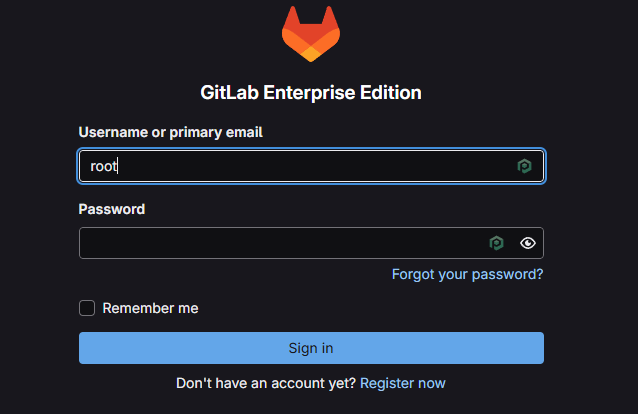
Truy cập https://gitlab.diendo.pro.vn
Truy cập https://jenkins.diendo.pro.vn
Chạy docker login registry.diendo.pro.vn phải thành công (dùng username GitLab & PAT).
docker login registry.diendo.pro.vn
Username: root
Password:
Chạy ssh [email protected] phải kết nối được.
ssh [email protected]
The authenticity of host 'ssh.gitlab.diendo.pro.vn (10.100.1.51)' can't be established.
ED25519 key fingerprint is SHA256:zfkzaA7jlUvR9OrDbh7lNFRL4kJKWfqf64RdfLc00G0.
This key is not known by any other names.
Are you sure you want to continue connecting (yes/no/[fingerprint])? yes
Warning: Permanently added 'ssh.gitlab.diendo.pro.vn' (ED25519) to the list of known hosts.
📝Giai đoạn 1: GitLab (Nơi chứa Code)
Tạo project và file pipeline Jenkinsfile.
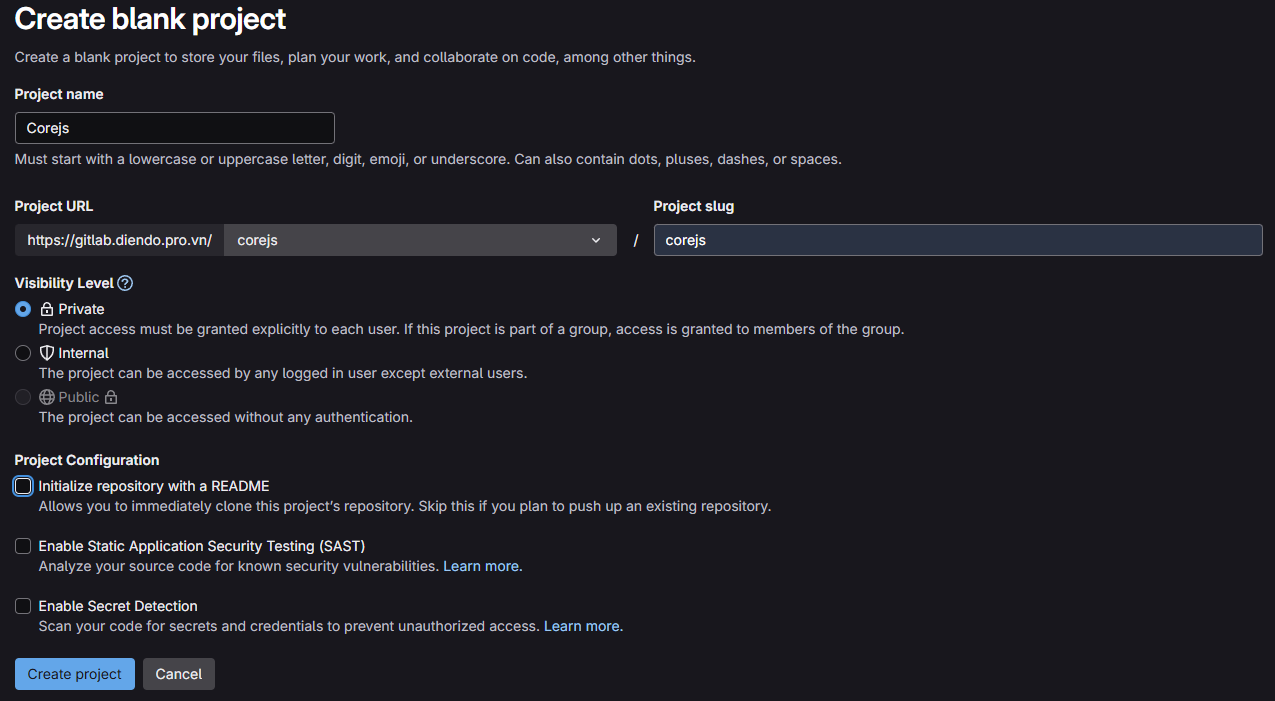
1. Tạo Project
- Truy cập
https://gitlab.diendo.pro.vn(Username:root, Password:BeoBeo..@2025) - Tạo project mới
corejs
cd D:\Project\
git clone http://gitlab.diendo.pro.vn/corejs/corejs.git
cd corejs
git switch --create main
touch README.md
git add README.md
git commit -m "add README"
git push --set-upstream origin main
git branch corejs
git checkout corejs
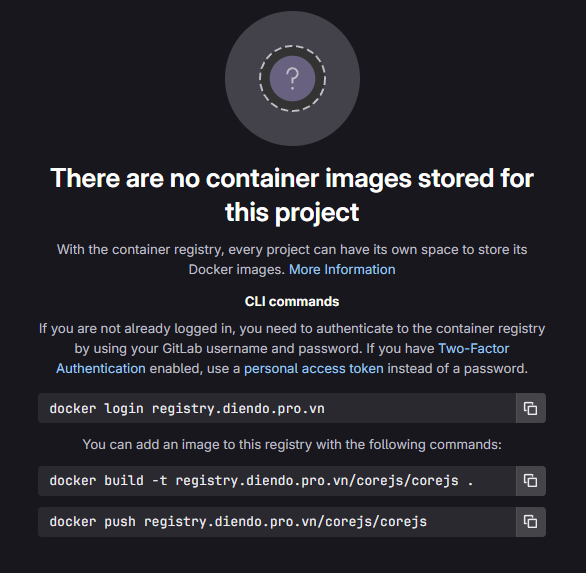
git push --set-upstream origin corejs2. Kiểm tra Repo Registry
vào đường link: https://gitlab.diendo.pro.vn/corejs/corejs/container_registry hoặc vào phần Deploy -> Container Registry để lấy thông tin repo
3. Tạo Jenkinsfile (Create Jenkinsfile):
- Clone project về máy tính
Via HTTPS
git clone https://gitlab.diendo.pro.vn/corejs/corejs.git
# Or via SSH
git clone [email protected]:corejs/corejs.git
cd corejs
- Tạo file mới tên
Jenkinsfile
Nội dung file: Jenkinsfile (File 3 – English Comments)
// Jenkinsfile - Simple Deploy to Docker Host (Cách 1: All-in-One)
// Builds production images and runs them on the host Docker daemon.
pipeline {
    // Run on the Jenkins controller itself, requires docker-cli installed via Dockerfile
    agent any

    environment {
        // --- Application & Image Naming ---
        REGISTRY_URL        = "registry.diendo.pro.vn"
        REGISTRY_CREDENTIAL = "docker-registry-creds"  // ID trùng với Jenkins

        // --- Application & Image Naming ---
        APP_NAME            = 'corejs' // Base name for images and containers
        FRONTEND_IMAGE      = "corejs/${APP_NAME}-frontend:latest" // Image name for frontend
        BACKEND_IMAGE       = "corejs/${APP_NAME}-backend:latest"  // Image name for backend
        FRONTEND_CONTAINER  = "${APP_NAME}-frontend-app" // Fixed container name for frontend
        BACKEND_CONTAINER   = "${APP_NAME}-backend-app"  // Fixed container name for backend

        // --- Host Port Configuration ---
        // Define ports on the Docker HOST machine where the containers will be accessible.
        // Make sure these ports (e.g., 8081, 5001) are free on your host.
        FRONTEND_HOST_PORT = 8081 // Access Frontend via http://<HOST_IP>:8081
        BACKEND_HOST_PORT  = 5001 // Access Backend via http://<HOST_IP>:5001

        // K8S_CREDENTIAL_ID = 'k8s-cluster-config' // ID credential kubeconfig
        K8S_CREDENTIAL_ID = 'k8s-config-file' // ID credential kubeconfig

        // --- Host Port Configuration ---
        // Define ports on the Docker HOST machine where the containers will be accessible.
        // Make sure these ports (e.g., 8081, 5001) are free on your host.
        FRONTEND_HOST_PORT = 8081 // Access Frontend via http://<HOST_IP>:8081
        BACKEND_HOST_PORT  = 5001 // Access Backend via http://<HOST_IP>:5001

        // --- Docker Network ---
        // Specify the Docker network the containers should connect to (must exist)
        DOCKER_NETWORK      = 'proxy_network'
    }

    stages {
        // --- Stage 1: Get latest code ---
        stage('1. Checkout Code') {
            steps {
                // Use Jenkins built-in SCM checkout step
                checkout scm
                echo "SUCCESS: Code checked out from GitLab."
            }
        }

        // --- Stage 2: Build Production Docker Images ---
        stage('2. Build & Push Docker Images') {
            parallel {
                stage('Frontend') {
                    steps {
                        dir('frontend') {
                            echo "🔧 Building frontend image: ${FRONTEND_IMAGE}"
                            sh "docker build -t ${FRONTEND_IMAGE} ."
                        }
                        script {
                            withCredentials([usernamePassword(
                                credentialsId: env.REGISTRY_CREDENTIAL,
                                usernameVariable: 'REG_USER',
                                passwordVariable: 'REG_PASS')]
                                ) {
                                sh '''
                                    echo "${REG_PASS}" | docker login ${REGISTRY_URL} -u "${REG_USER}" --password-stdin
                                    docker tag ${FRONTEND_IMAGE} ${REGISTRY_URL}/corejs/${FRONTEND_IMAGE}
                                    docker push ${REGISTRY_URL}/${FRONTEND_IMAGE}
                                    docker logout ${REGISTRY_URL}
                                '''
                            }
                        }
                        echo "✅ Frontend image pushed successfully."
                    }
                }

                stage('Backend') {
                    steps {
                        dir('CoreAPI') {
                            echo "🔧 Building backend image: ${BACKEND_IMAGE}"
                            sh "docker build -t ${BACKEND_IMAGE} ."
                        }
                        script {
                            withCredentials([usernamePassword(
                                credentialsId: env.REGISTRY_CREDENTIAL,
                                usernameVariable: 'REG_USER',
                                passwordVariable: 'REG_PASS')]
                                ) {
                                sh '''
                                    echo "${REG_PASS}" | docker login ${REGISTRY_URL} -u "${REG_USER}" --password-stdin
                                    docker tag ${FRONTEND_IMAGE} ${REGISTRY_URL}/corejs/${FRONTEND_IMAGE}
                                    docker push ${REGISTRY_URL}/${BACKEND_IMAGE}
                                    docker logout ${REGISTRY_URL}
                                '''
                            }
                        }
                        echo "✅ Backend image pushed successfully."
                    }
                }
            }
        }

        // --- Stage 3: Manual Approval Gate ---
        stage('3. CTO Approval') {
            steps {
                // Pause the pipeline, waiting for manual input
                timeout(time: 1, unit: 'HOURS') {
                    input message: 'ACTION REQUIRED: Approve deployment to Production (Docker Host)?',
                          ok: 'Proceed to Deploy',
                          submitter: 'cto' // Only user 'cto' can approve
                }
            }
        } // End Stage 3

        // --- Stage 4: Deploy Containers to Docker Host ---
        stage('4. Deploy to Production (Docker Host)') {
            steps {
                echo "INFO: Approval received. Deploying containers to Docker Host..."

                // --- Stop and Remove Old Containers ---
                // Ensures a clean deployment by removing any previous versions
                // '|| true' prevents the pipeline from failing if the container doesn't exist
                echo "INFO: Stopping and removing old containers (if they exist)..."
                sh "docker stop ${env.FRONTEND_CONTAINER} || true"
                sh "docker rm ${env.FRONTEND_CONTAINER} || true"
                sh "docker stop ${env.BACKEND_CONTAINER} || true"
                sh "docker rm ${env.BACKEND_CONTAINER} || true"

                // --- Run New Backend Container ---
                echo "INFO: Starting new Backend container..."
                // Runs the container using the image built in Stage 2
                // -d: Run in detached (background) mode
                // --name: Assign a fixed, predictable name
                // -p HOST_PORT:CONTAINER_PORT : Map the host port to the container's internal port
                //    (Assumes the backend service listens on port 80 inside the container)
                // --network: Connect the container to the specified Docker network
                // --hostname: Set the hostname inside the container
                // --restart always: Ensure the container restarts if it stops or on host reboot
                //sh "docker run -d --name ${env.BACKEND_CONTAINER} -p ${env.BACKEND_HOST_PORT}:80 --network ${env.DOCKER_NETWORK} --hostname ${env.BACKEND_CONTAINER} --restart always ${env.BACKEND_IMAGE}"
                sh "docker run -d --name ${env.BACKEND_CONTAINER} -p ${env.BACKEND_HOST_PORT}:80 --hostname ${env.BACKEND_CONTAINER} ${env.BACKEND_IMAGE}"
                echo "SUCCESS: Backend container started."

                // --- Run New Frontend Container ---
                 echo "INFO: Starting new Frontend container..."
                // Assumes the Nginx server inside the frontend image listens on port 80
                //sh "docker run -d --name ${env.FRONTEND_CONTAINER} -p ${env.FRONTEND_HOST_PORT}:80 --network ${env.DOCKER_NETWORK} --hostname ${env.FRONTEND_CONTAINER} --restart always ${env.FRONTEND_IMAGE}"
                sh "docker run -d --name ${env.FRONTEND_CONTAINER} -p ${env.FRONTEND_HOST_PORT}:80  --hostname ${env.FRONTEND_CONTAINER} ${env.FRONTEND_IMAGE}"
                echo "SUCCESS: Frontend container started."

                // --- Output Access Information ---
                echo "----------------------------------------------------"
                echo "✅ DEPLOYMENT COMPLETE!"
                echo "   Access Frontend at: http://<DOCKER_HOST_IP>:${env.FRONTEND_HOST_PORT}"
                echo "   Access Backend API at: http://<DOCKER_HOST_IP>:${env.BACKEND_HOST_PORT}"
                echo "----------------------------------------------------"
                echo "(Replace <DOCKER_HOST_IP> with your host's actual IP, e.g., 192.168.110.161)"
            }
        } // End Stage 4

    } // End of stages

    // --- Post-build Actions ---
    // Actions to perform after the pipeline finishes
    post {
        always { // Always run these steps
            echo 'INFO: Pipeline finished execution.'
            // cleanWs() // Option to clean the Jenkins workspace
        }
        success { // Run only on success
            echo '✅ SUCCESS: Pipeline completed successfully!'
            // Add success notifications (email, Slack, etc.) here
        }
        failure { // Run only on failure
            echo '❌ FAILED: Pipeline failed!'
            // Add failure notifications here
        }
    } // End of post

} // End of pipeline
3. Push Jenkinsfile lên Gitlab
# Stage the new Jenkinsfile
git add Jenkinsfile
# Commit the change
git commit -m "Add Jenkinsfile for Docker host deployment"
# Push to the appropriate branch (e.g., nodejs or main)
git push -u origin
👷Giai đoạn 2: Jenkins (Nơi Build)
Cấu hình Jenkins để nó “biết” về project và cách thực thi pipeline.
1. Đăng nhập lần đầu & Cài đặt cơ bản:
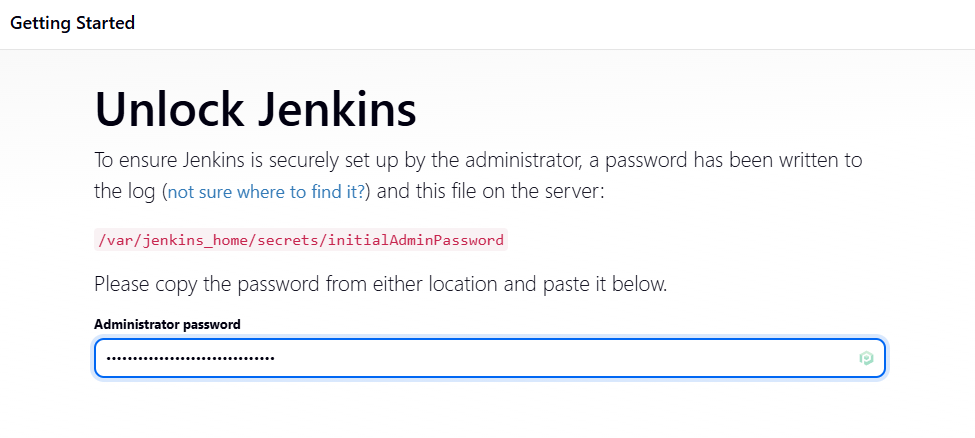
- Truy cập
https://jenkins.diendo.pro.vn - Lấy mật khẩu admin ban đầu
# Find the Jenkins container ID and print the initial password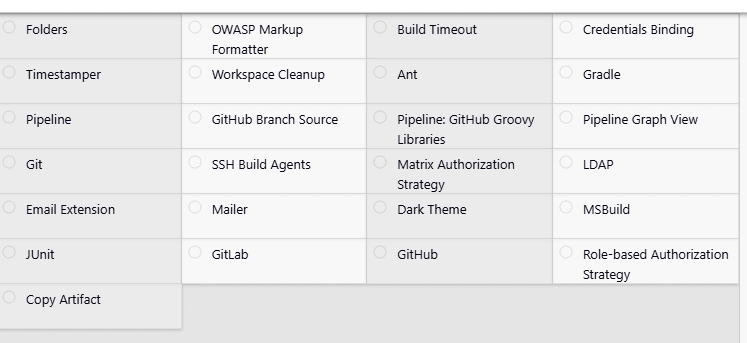
docker exec $(docker ps -qf "name=tonytechlab_jenkins") cat /var/jenkins_home/secrets/initialAdminPassword- Hòan thành cài đặt các Plugin cần thiết (
Matrix Authorizatioin Strategy, Gitlab, ...)
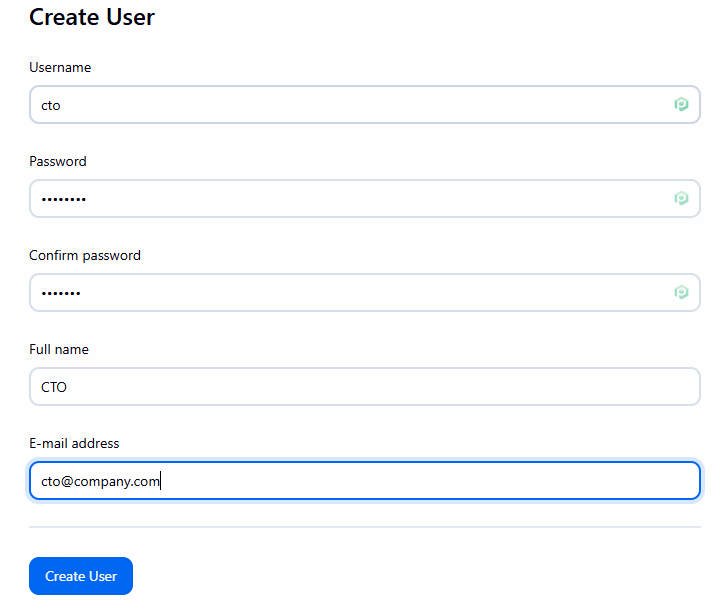
- Tạo user cto, dev: Vào
Manage Jenkins->Sercurity->Manage Users->Create User. Tạo usercto, dev(Password tùy ý)

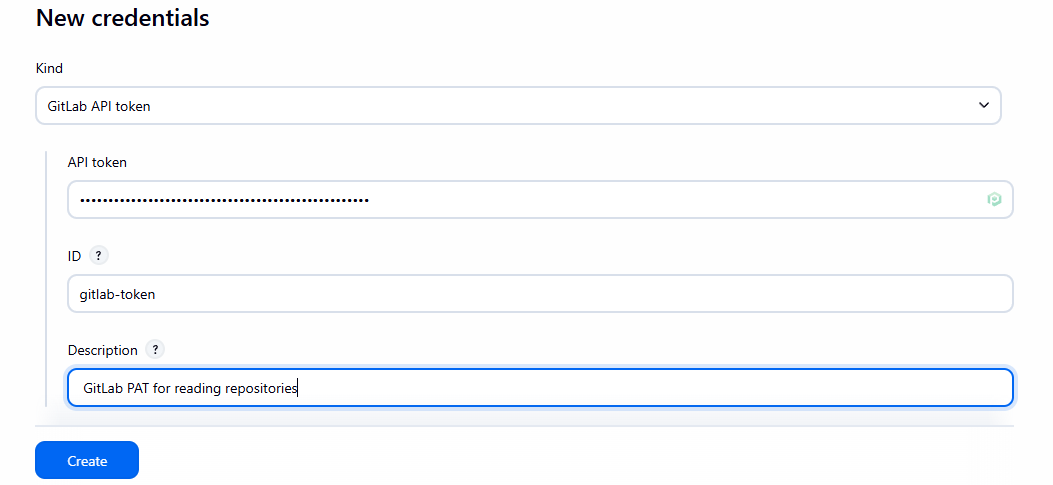
2. Tạo Credentials cho GitLab: (Để Jenkins đọc được code)
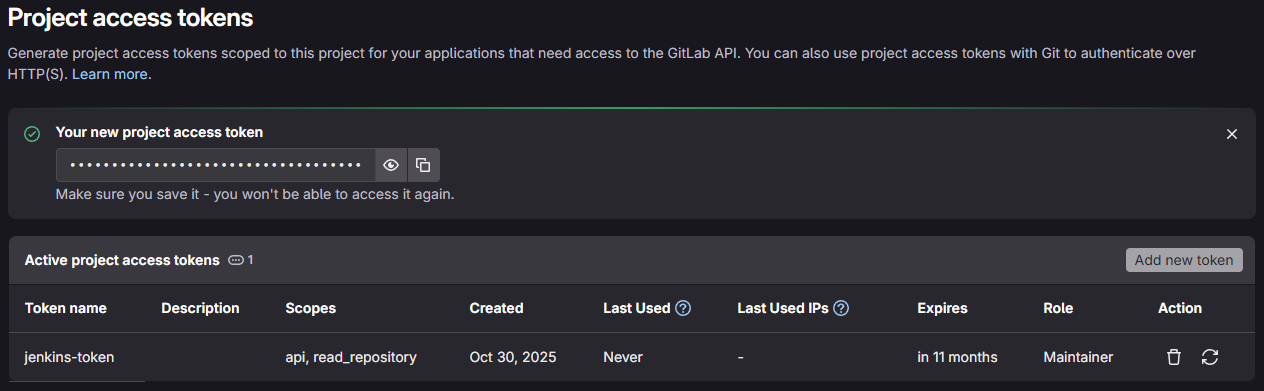
- Vào GitLab (user
root), tạo Personal Access Token (User Settings -> Access Tokens). Đặt tênjenkins-token, chọn scopesapivàread_repository. Copy token.
Tạo Credentials trên Jenkins
- Vào Jenkins
Manage Jenkins->Security->Credentials->(global). Add Credentials:- Kind:
GitLab Personal Access Token - Token: Dán token của bạn.
- ID:
gitlab-token(Ghi nhớ ID này). - Description:
GitLab PAT for reading repositories
- Kind:
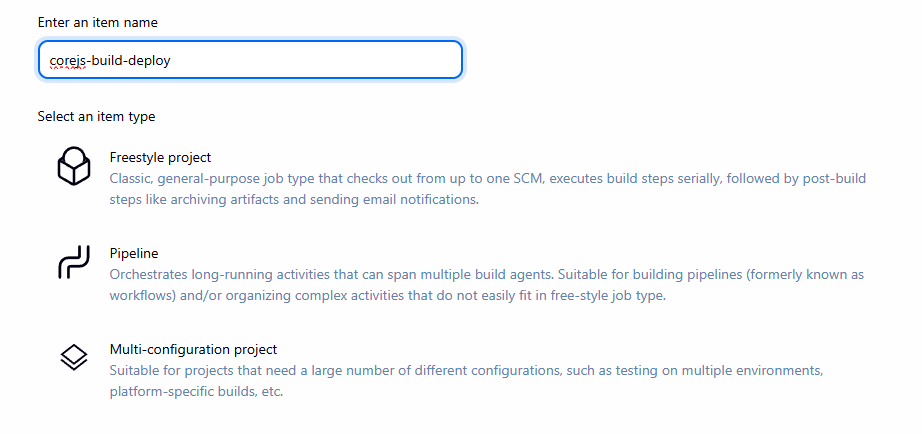
4. Tạo Pipeline Job: (Đây là “Công việc” Jenkins sẽ thực thi)
- Trang chủ Jenkins ->
New Item. - Enter an item name:
corejs-build-deploy(Hoặc tên bạn muốn). - Chọn
Pipeline->OK.
- Tab General: Tích
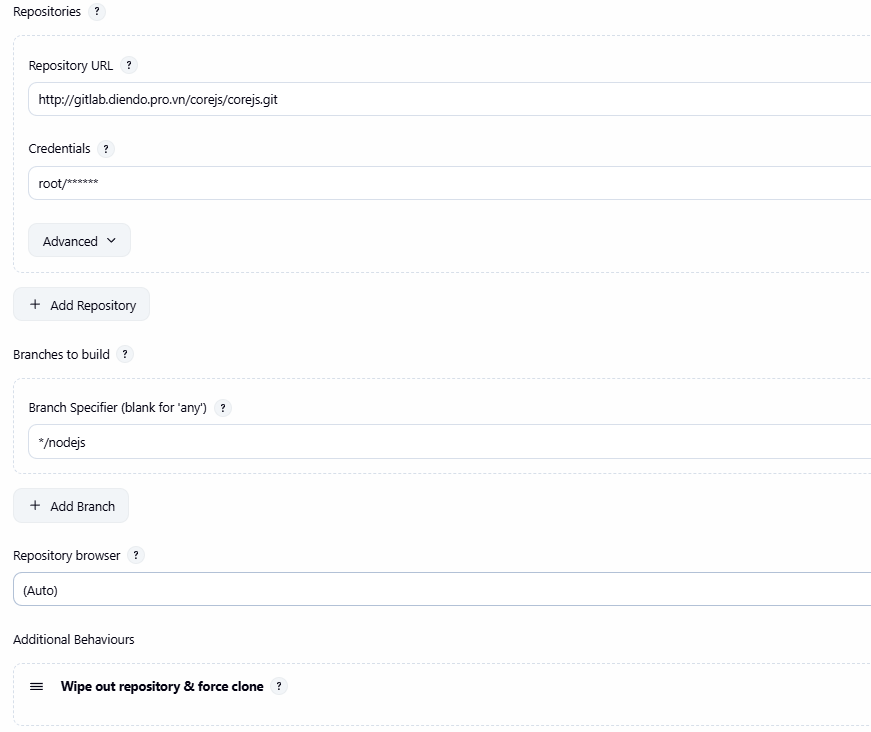
GitLab Connection. - Tab Pipeline:
- Definition:
Pipeline script from SCM. - SCM:
Git. - Repository URL:
https://gitlab.diendo.pro.vn/corejs/corejs.git(URL HTTPS của project). - Credentials: Chọn
gitlab-token. - Branches to build -> Branch Specifier:
*/nodejs(Hoặc nhánh bạn pushJenkinsfilelên). - Script Path:
Jenkinsfile. - **(Quan trọng)** Nhấn
Addbên cạnh Additional Behaviours -> ChọnWipe out repository & force clone.
- Definition:
- Nhấn
Save.
Giai đoạn 3: Kết nối Webhook (Trigger) 🔗
Bước này để GitLab tự động “gọi” Jenkins mỗi khi có code mới được push.
1. Lấy Secret Token từ Jenkins:
- Mở job
corejs-build-deploy->Configure->Build Triggers. - Tích vào:
Build when a change is pushed to GitLab.
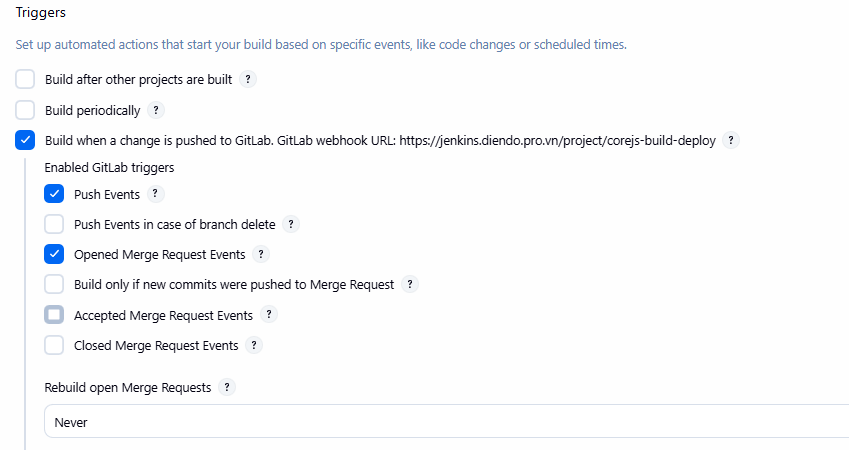
- Nhấn
Advanced -> Secret token->Generate(trong mục Secret token).

- Copy token bí mật đó.
- Nhấn
Save.
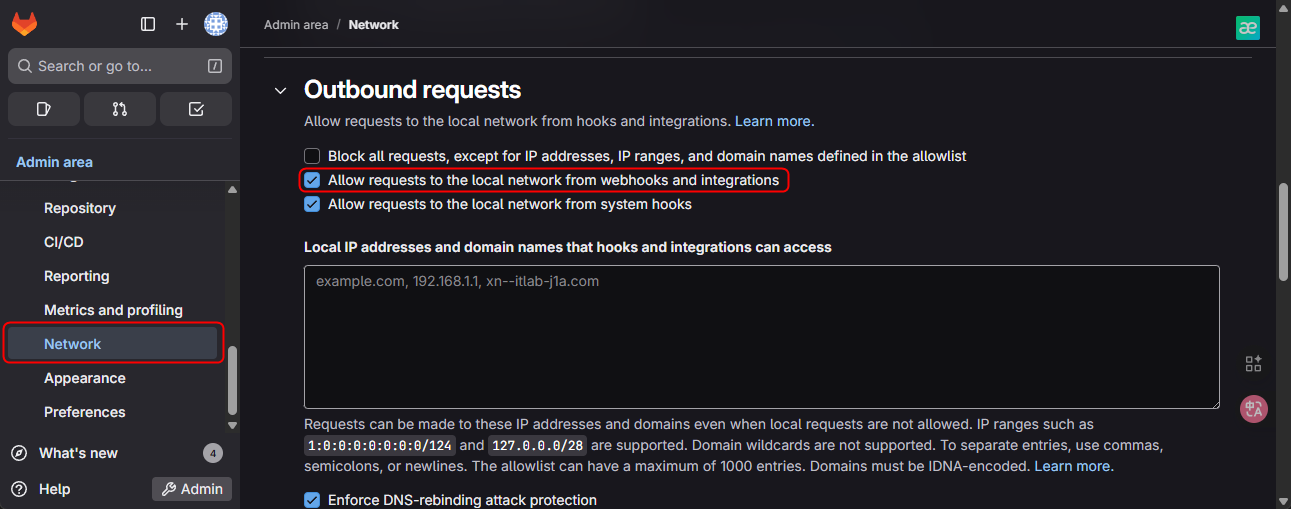
2. Tạo Webhook trên GitLab:
Admin Area -> Settings -> Network -> Outbound requestsvà tick vào ô"Allow requests to the local network from web hooks and services".
- Mở project
corejs->Settings->Webhooks. - URL:
https://jenkins.diendo.pro.vn/project/corejs-build-deploy(Thay tên job nếu khác). - Secret Token: Dán token bí mật từ Jenkins.
- Trigger: Chỉ tích
Push events.
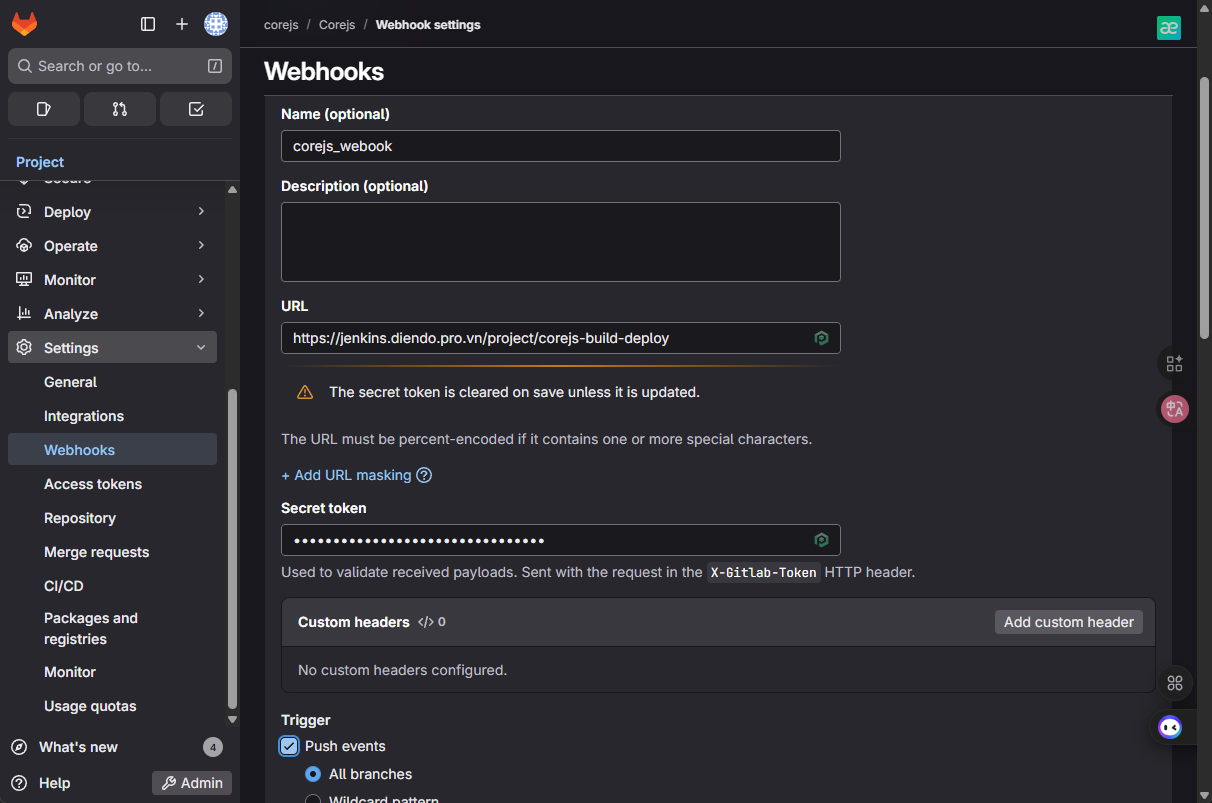
- SSL verification: BỎ TÍCH (Untick) ô “Enable SSL verification”.
- Nhấn
Add webhook.
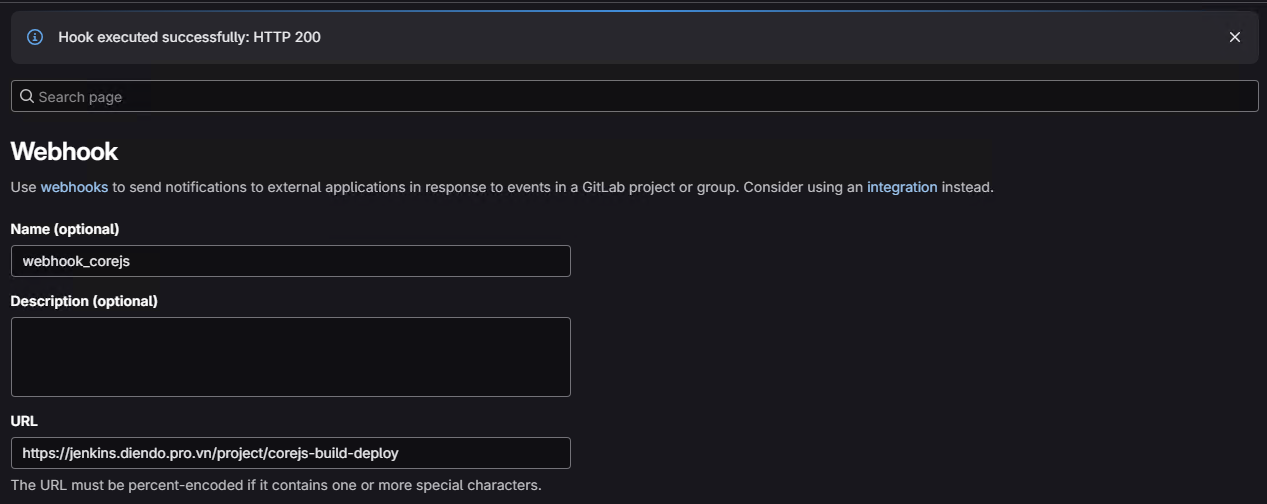
3. Kiểm tra Webhook (Test Webhook):
- Cuộn xuống, nhấn
Test->Push events. - Bạn PHẢI thấy:
Hook executed successfully: HTTP 200.
🚀Giai đoạn 4: Chạy Thử & Kiểm Tra
Bây giờ, hãy thử nghiệm toàn bộ luồng CI/CD và kiểm tra ứng dụng được deploy.
Developer Push Code:
- Sửa một file bất kỳ trong project
corejs. - Chạy các lệnh git:
git add .
git commit -m "Test full pipeline with Docker deploy"
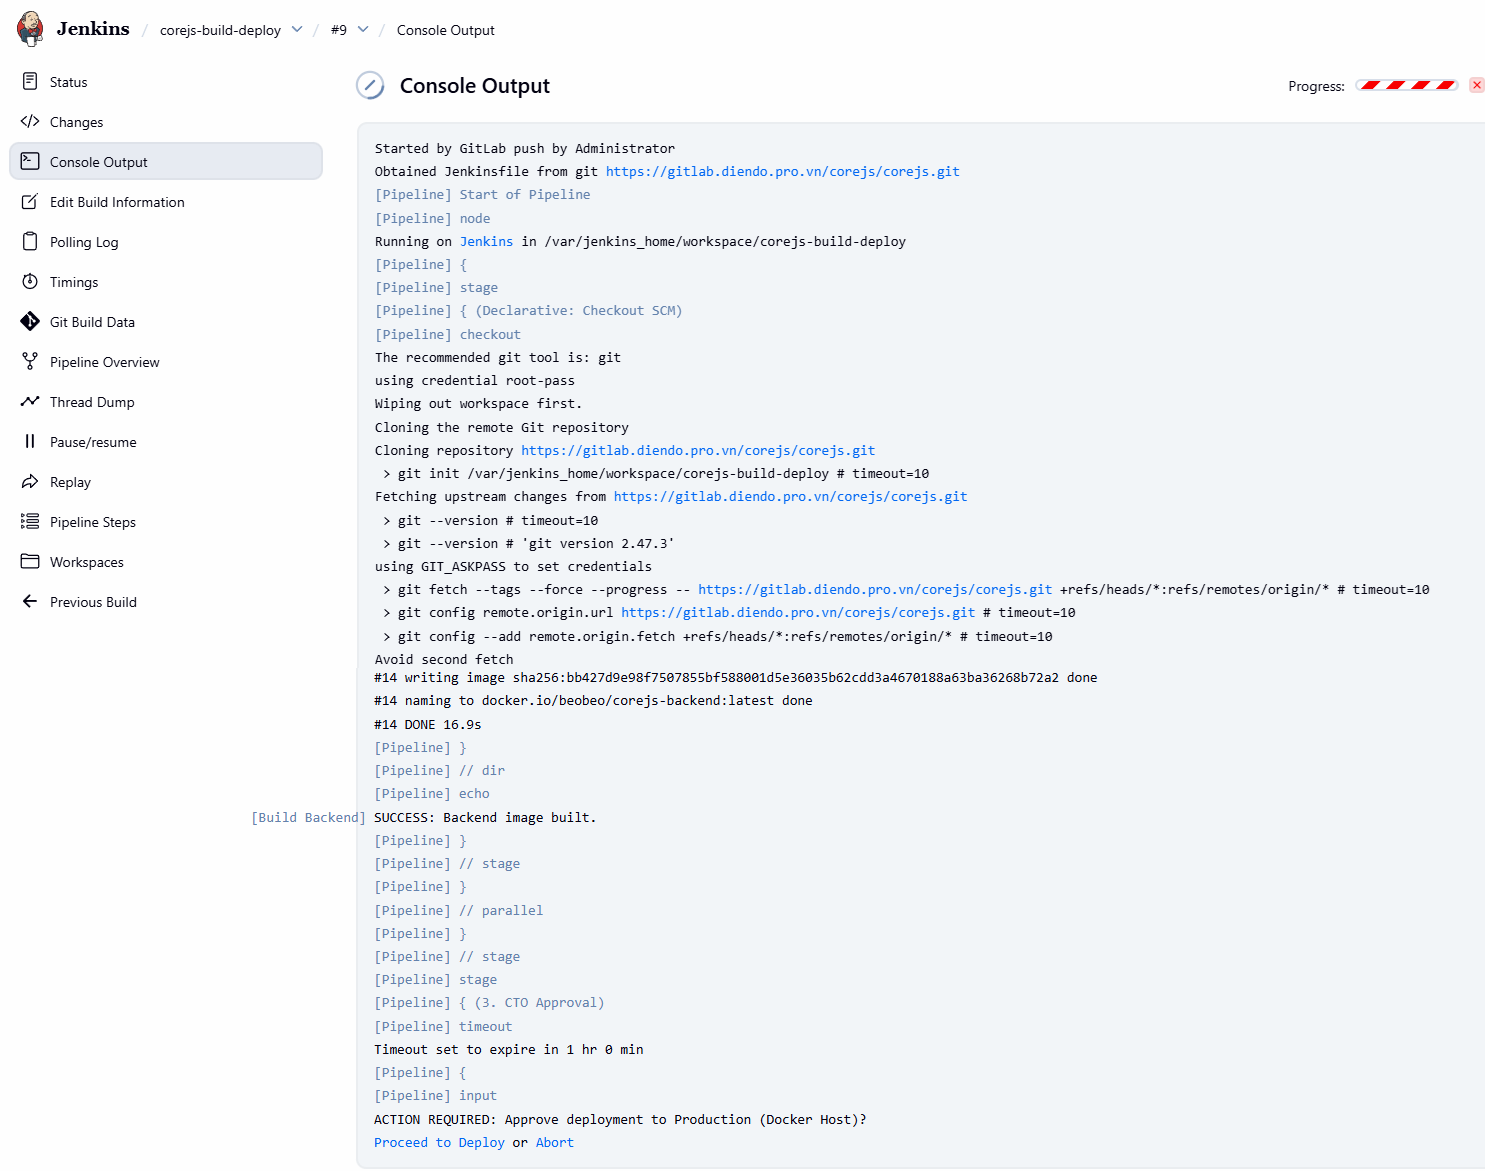
git push origin Quan sát Jenkins:
- Mở
https://jenkins.diendo.pro.vn - Job
corejs-build-deploysẽ tự động chạy. - Nhấn vào job đang chạy. Nó sẽ chạy qua Stage 1, 2 và DỪNG LẠI ở Stage 3 “CTO Approval”.
CTO Phê duyệt (CTO Approval):
- Đăng nhập vào Jenkins bằng user
cto. - Mở job đang tạm dừng.
- Di chuột vào stage “CTO Approval”, nhấn nút
Proceed.
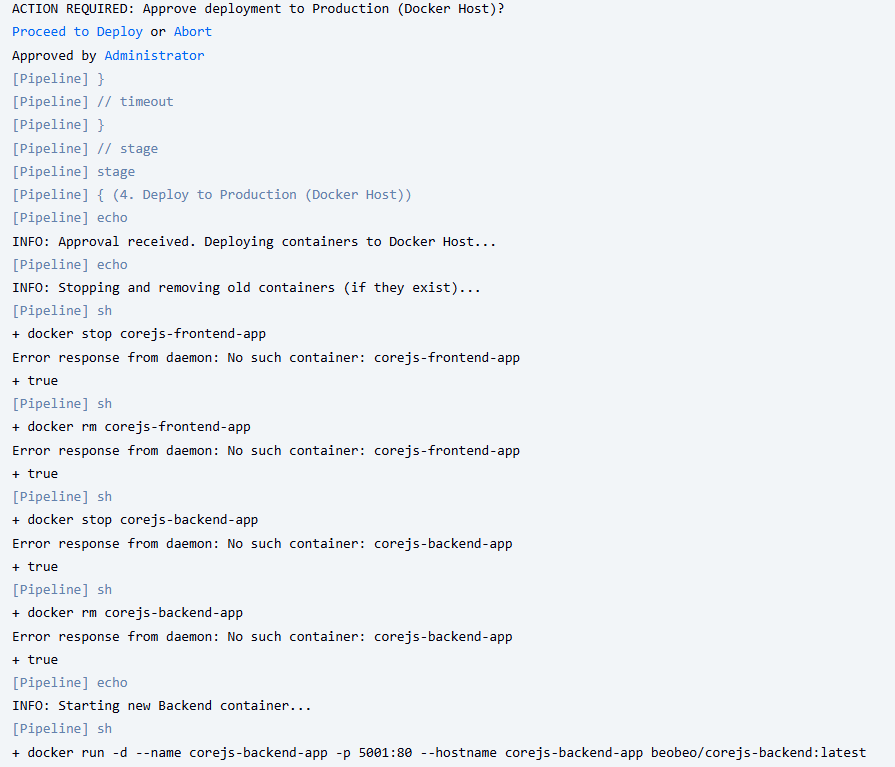
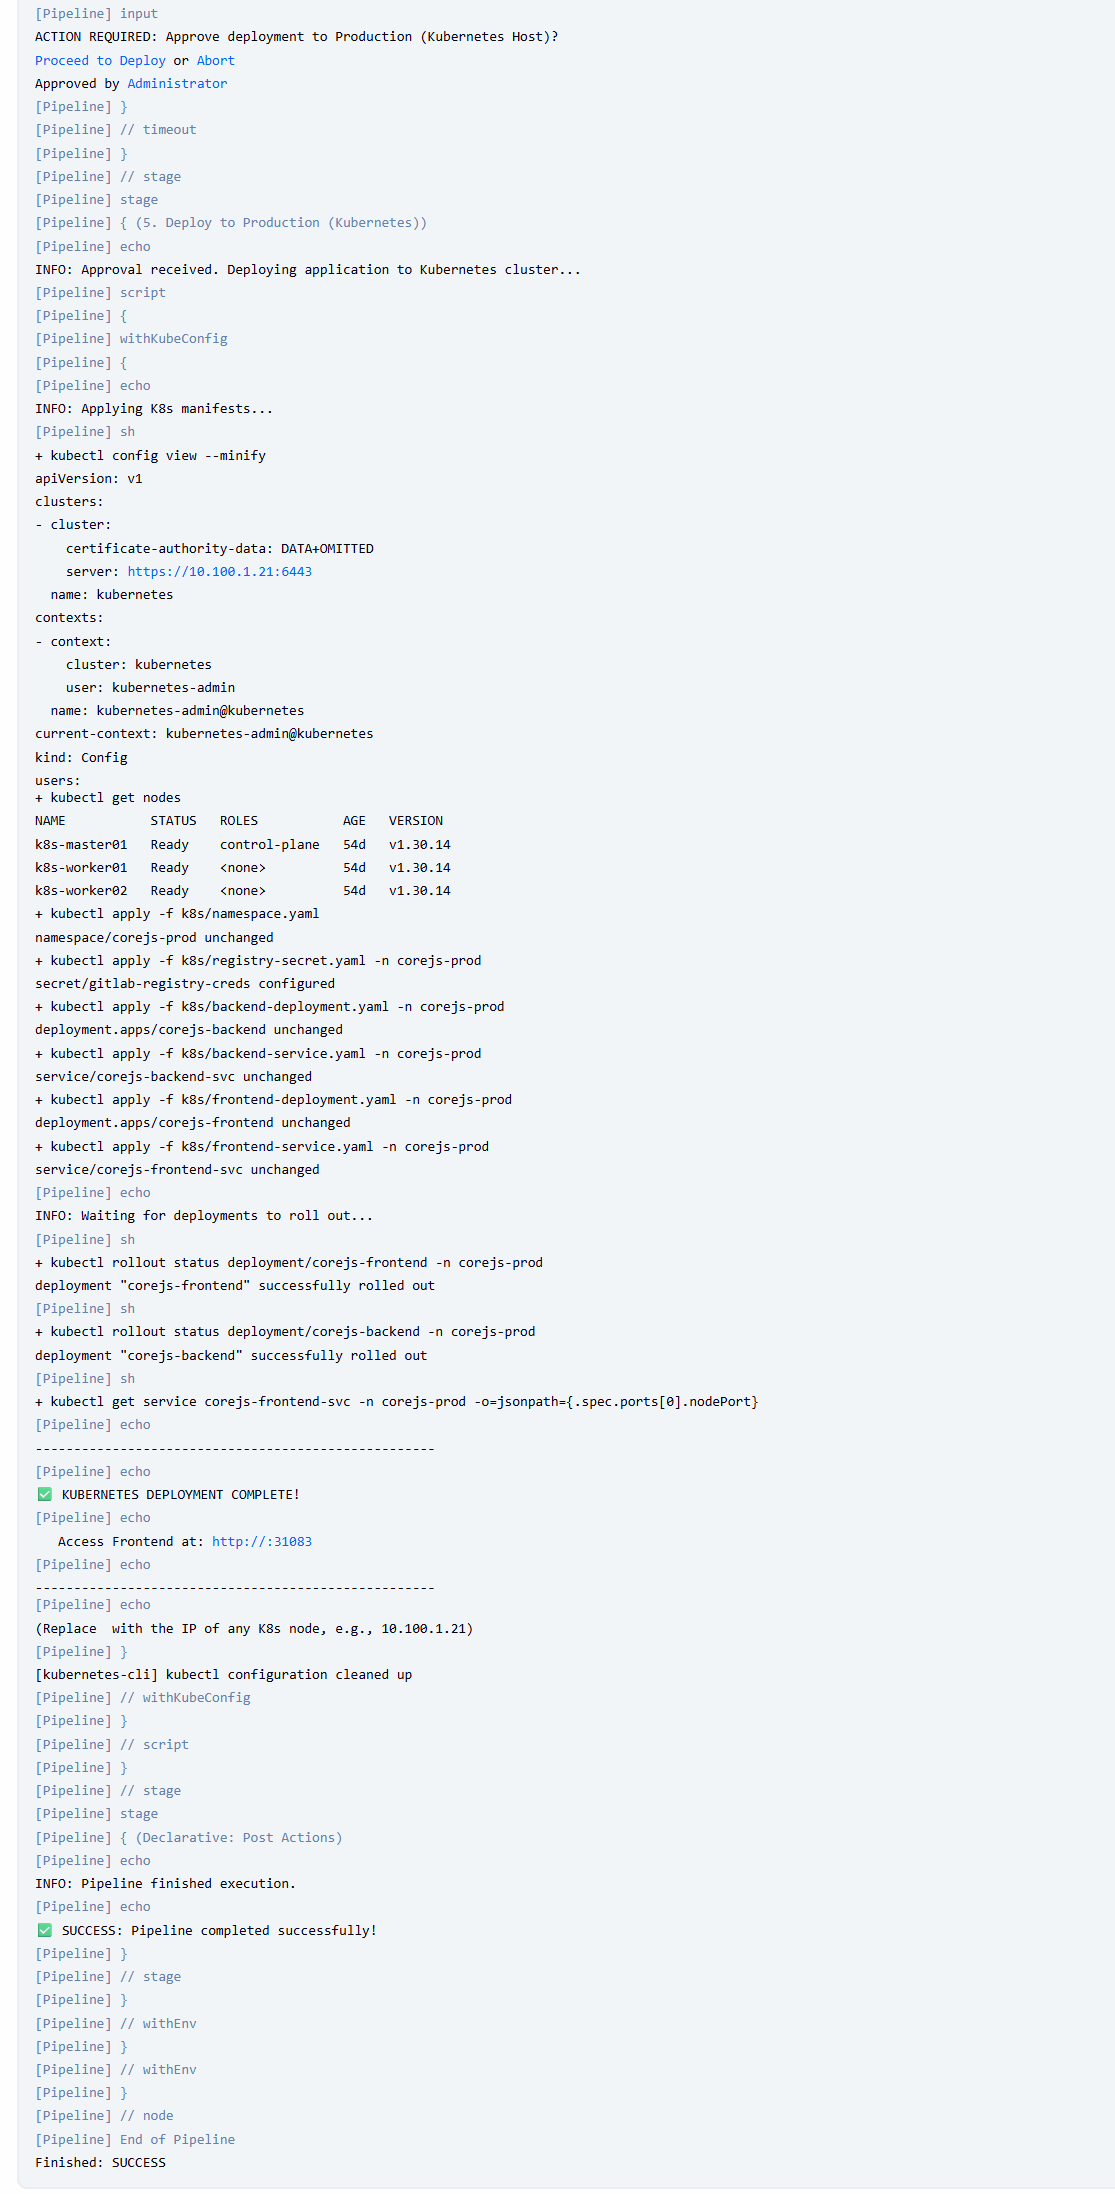
Hoàn tất Deploy & Kiểm tra Ứng dụng:
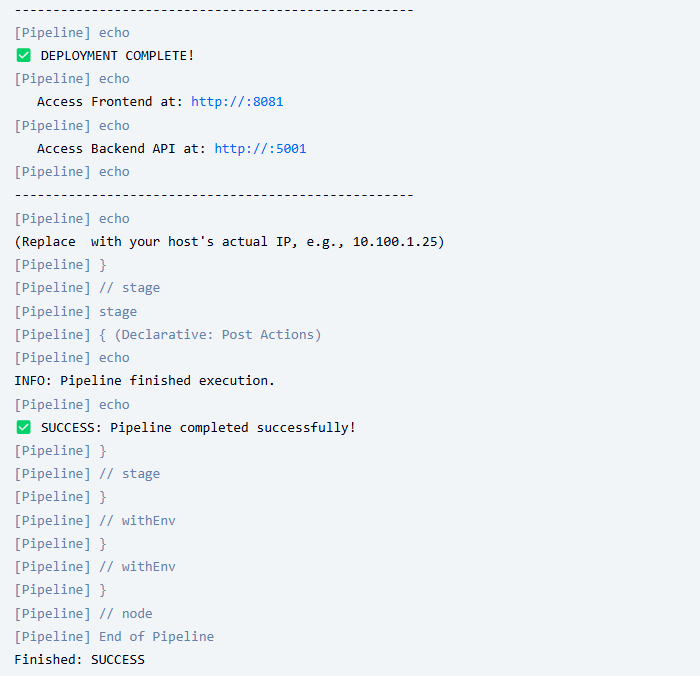
- Pipeline sẽ tiếp tục chạy Stage 4 (Deploy) và báo
SUCCESS. - Kiểm tra “Console Output” để xem log, đặc biệt là các dòng cuối cùng báo URL truy cập.
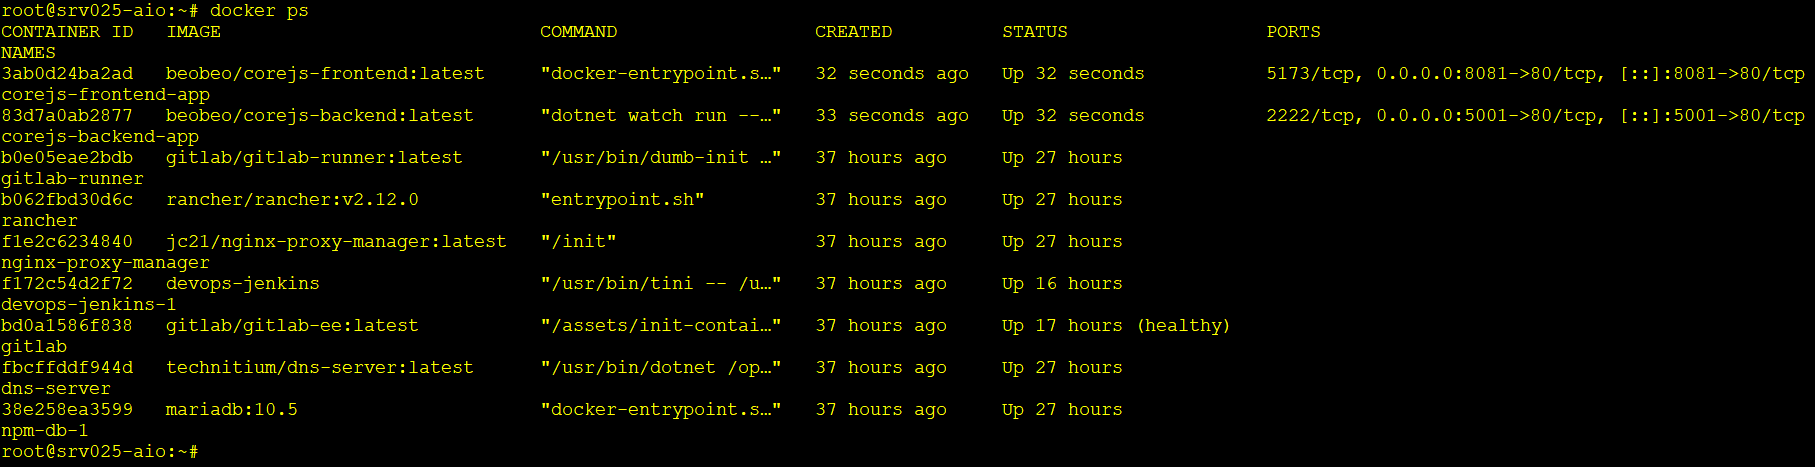
- SSH vào máy host Linux (`tony@gitlab`), chạy
docker psđể xem 2 containercorejs-frontend-appvàcorejs-backend-appđang chạy và map đúng port (ví dụ:8081->80/tcp,5001->80/tcp).
- Truy cập Ứng dụng: Mở trình duyệt trên máy Windows, truy cập:
- Frontend:
http://10.100.1.25:8081(Thay IP host và port nếu bạn đặt khác trongJenkinsfile). - Backend:
http://10.10.1.25:5001
- Frontend:
Backend:

Frontend:
Giai đoạn 5 (Nâng cao): Triển khai lên Kubernetes 🚢
Sau khi đã thành thạo “Cách 1”, bạn có thể nâng cấp pipeline để deploy ứng dụng lên cụm Kubernetes thay vì Docker host. Đây là hướng dẫn sơ bộ, bạn cần điều chỉnh chi tiết cho phù hợp.
Bước 1: Chuẩn bị file Manifest Kubernetes
Bạn cần tạo các file YAML định nghĩa cách ứng dụng chạy trên K8s (Deployment, Service). Tạo một thư mục k8s trong project corejs.
File: k8s/namespace.yaml (Tùy chọn)
apiVersion: v1
kind: Namespace
metadata:
  name: corejs-prod # Tên namespace cho ứng dụng
File: k8s/registry-secret.yaml (Bắt buộc nếu Registry không public)
K8s cần biết cách login vào GitLab Registry để kéo image.
kubectl create secret docker-registry gitlab-registry-creds \
  --docker-server=registry.diendo.pro.vn \
  --docker-username=root \
  --docker-password=glpat-fQhBFJ54AzG1cgIwm6KT1G86MQp1OjUH \
  --namespace=corejs-prod \
  --dry-run=client -o yaml > k8s/registry-secret.yaml
File registry-secret.yaml sẽ được tạo ra.
File: k8s/backend-deployment.yaml
apiVersion: apps/v1
kind: Deployment
metadata:
  name: corejs-backend
  namespace: corejs-prod
spec:
  replicas: 1 # Số lượng pod muốn chạy
  selector:
    matchLabels:
      app: corejs-backend
  template:
    metadata:
      labels:
        app: corejs-backend
    spec:
      # K8s sẽ dùng secret này để kéo image
      imagePullSecrets:
      - name: gitlab-registry-creds
      containers:
      - name: backend
        # Image được build bởi Jenkins
        image: tonytechlab/corejs-backend:latest
        ports:
        - containerPort: 80 # Port mà backend lắng nghe bên trong
File: k8s/backend-service.yaml
apiVersion: v1
kind: Service
metadata:
  name: corejs-backend-svc # Tên service nội bộ
  namespace: corejs-prod
spec:
  selector:
    app: corejs-backend
  ports:
    - protocol: TCP
      port: 80 # Port mà các service khác trong K8s gọi đến
      targetPort: 80 # Trỏ đến containerPort của Deployment
  type: NodePort
File: k8s/frontend-deployment.yaml
apiVersion: apps/v1
kind: Deployment
metadata:
  name: corejs-frontend
  namespace: corejs-prod
spec:
  replicas: 1
  selector:
    matchLabels:
      app: corejs-frontend
  template:
    metadata:
      labels:
        app: corejs-frontend
    spec:
      imagePullSecrets:
      - name: gitlab-registry-creds
      containers:
      - name: frontend
        image: tonytechlab/corejs-frontend:latest # Image Nginx đã build
        ports:
        - containerPort: 80 # Port Nginx lắng nghe bên trong
File: k8s/frontend-service.yaml (Dùng NodePort)
apiVersion: v1
kind: Service
metadata:
  name: corejs-frontend-svc
  namespace: corejs-prod
spec:
  selector:
    app: corejs-frontend
  # --- SỬ DỤNG NODEPORT ĐỂ TRUY CẬP TỪ BÊN NGOÀI ---
  type: NodePort
  ports:
    - protocol: TCP
      port: 80       # Port bên trong cluster
      targetPort: 80   # Port của container
      # nodePort: 30080 # Tùy chọn: Chỉ định port cụ thể (30000-32767)
      # Nếu bỏ trống, K8s sẽ tự chọn 1 port NodePort
File: k8s/ingress.yaml
# k8s/ingress.yaml
apiVersion: networking.k8s.io/v1
kind: Ingress
metadata:
  name: corejs-ingress
  namespace: corejs-prod
  annotations:
    nginx.ingress.kubernetes.io/rewrite-target: /
spec:
  rules:
  - host: "nodejs.diendo.pro.vn"
    http:
      paths:
      - path: /
        pathType: Prefix
        backend:
          service:
            name: corejs-frontend
            port:
              number: 80
Bước 2: Cài đặt kubectl trong Jenkins (Đã làm ở Dockerfile)
File jenkins/Dockerfile đã bao gồm bước cài kubectl.
Kiểm tra, đi vào container jenkins gõ lệnh kubectl
iadmin@srv025-aio:~$ docker exec -it devops-jenkins-1 /bin/bash
root@f172c54d2f72:/# kubectl
kubectl controls the Kubernetes cluster manager.

 Find more information at: https://kubernetes.io/docs/reference/kubectl/

Basic Commands (Beginner):
  create          Create a resource from a file or from stdin
  expose          Take a replication controller, service, deployment or pod and expose it as a new Kubernetes service
  run             Run a particular image on the cluster
  set             Set specific features on objects
Bước 3: Tạo K8s Credentials trong Jenkins
Jenkins cần quyền để kết nối và deploy lên cụm K8s.
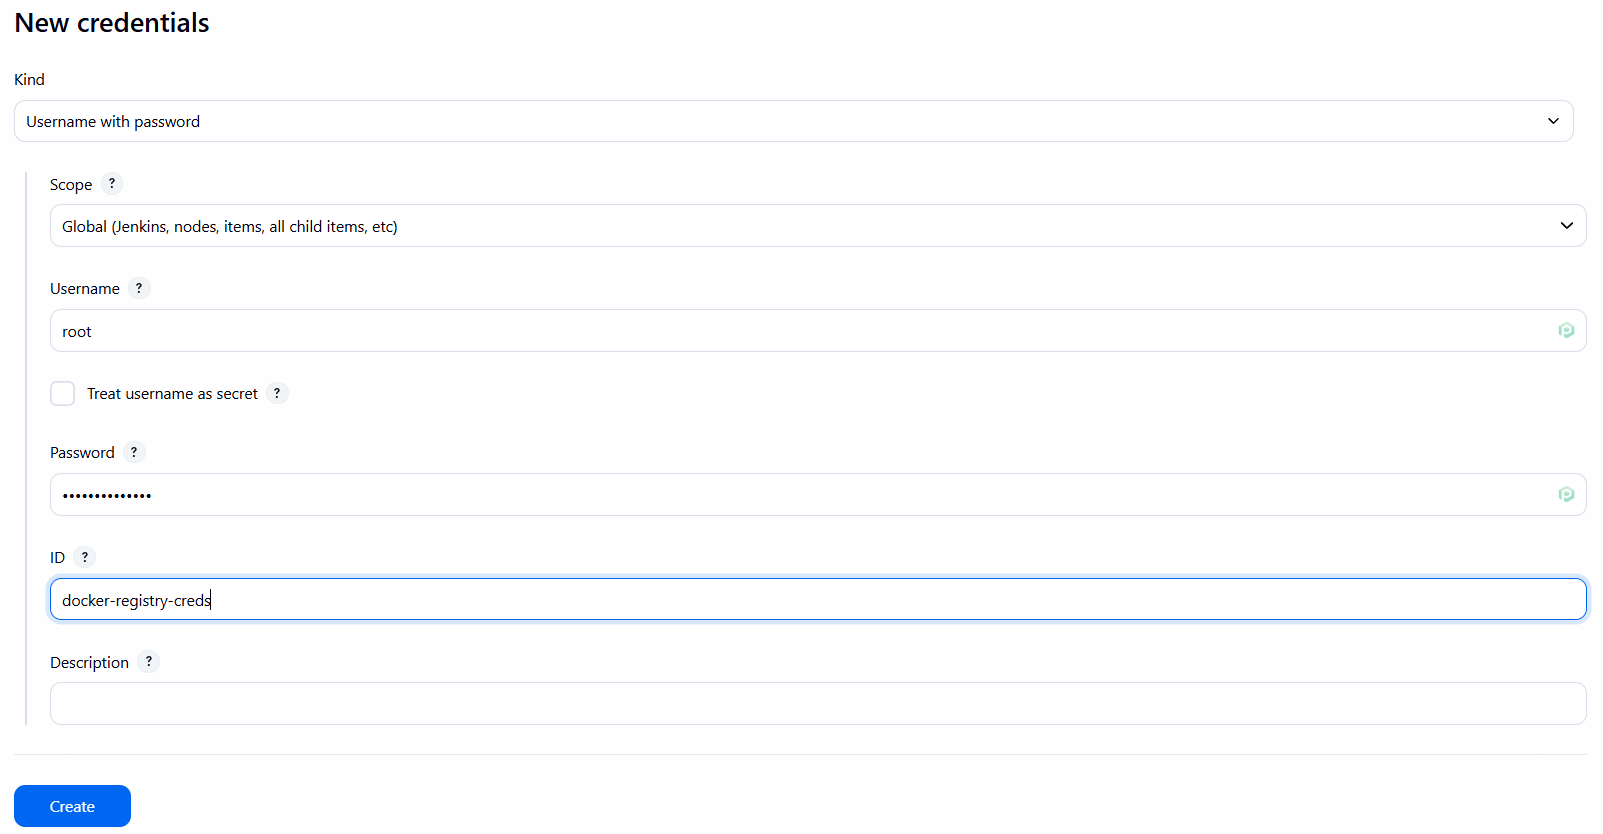
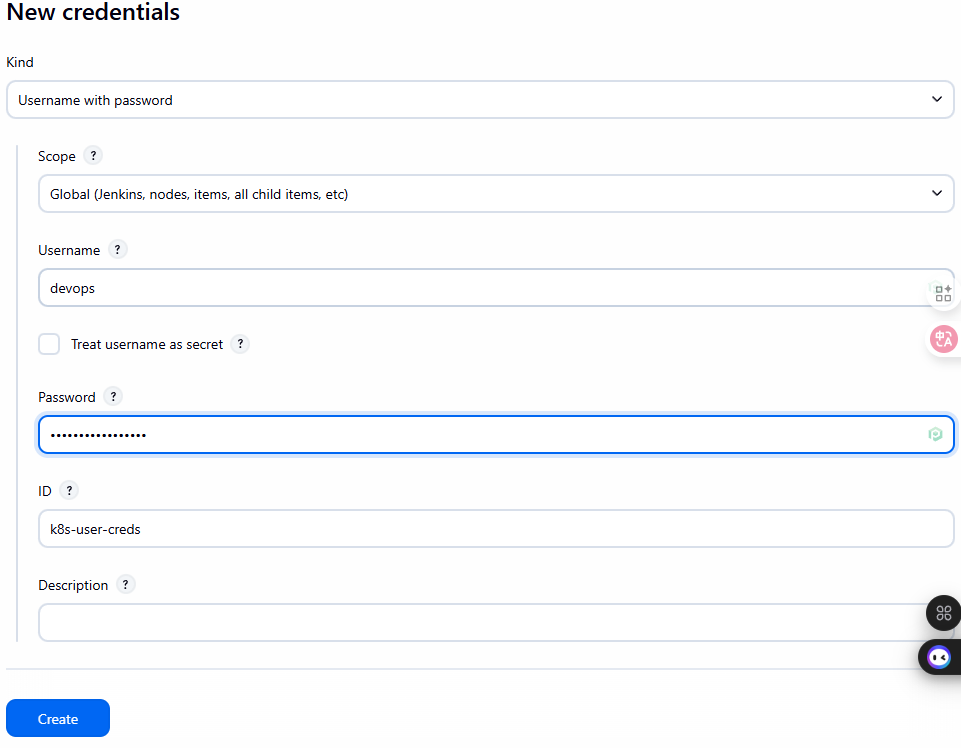
Cách 1 (Username/Password – Đơn giản nhưng kém an toàn):
- Vào
Jenkins -> Credentials -> (global) -> Add Credentials. - Kind: Username with password.
- Username:
devops - Password:
Password của user - ID:
k8s-user-creds
Cách 2 (Kubeconfig – Khuyến nghị):
- SSH vào
k8s-master-1. - Copy nội dung file
~/.kube/config. - Cần phải cài thêm
Kubernetes, KubernetesCLI Pluginsau đó add thêmCredentials - Vào
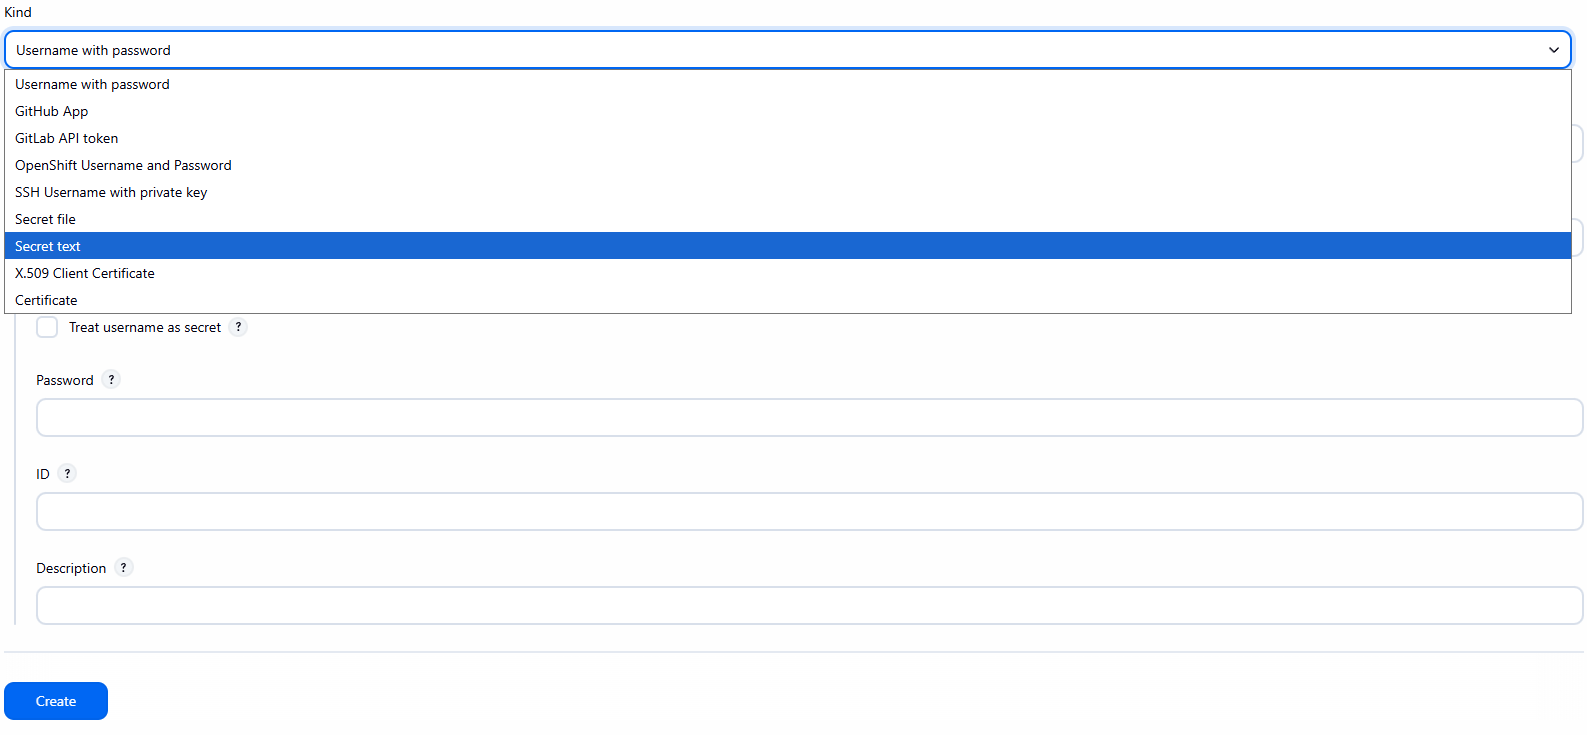
Jenkins -> Credentials -> (global) -> Add Credentials. - Kind:
Secret text. - ID:
k8s-cluster-config - Kubeconfig: Chọn
Enter directlyvà dán nội dung file config vào
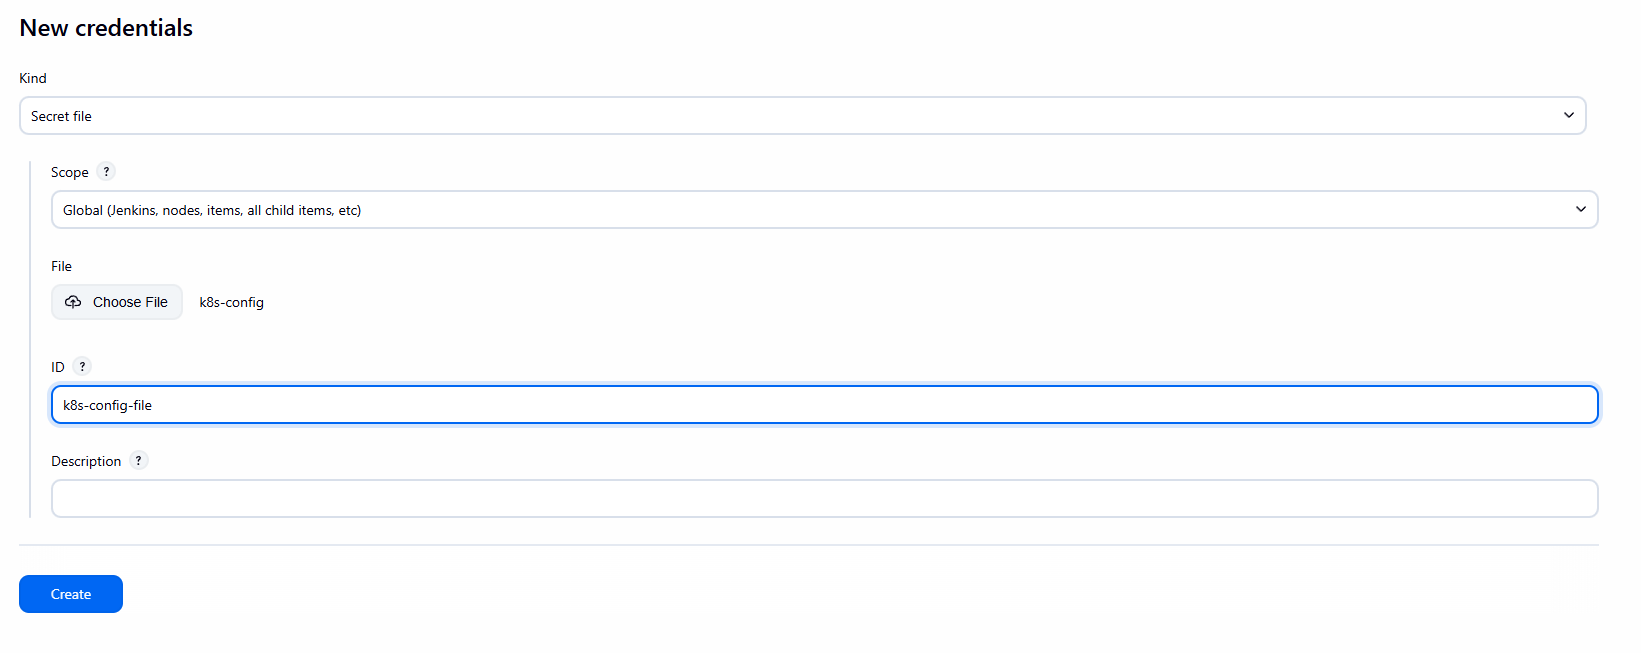
Cách 3 (Kubeconfig – Khuyến nghị):
- SSH vào
k8s-master-1. - Copy nội dung file
~/.kube/config. - Cần phải cài thêm
Kubernetes, KubernetesCLI Pluginsau đó add thêmCredentials - Vào
Jenkins -> Credentials -> (global) -> Add Credentials. - Kind:
Secret file. - Uploadfile config của kụm k8s lên Jenkins
- ID:
k8s-config-file
Lưu ý: Cách dùng Kubeconfig an toàn và linh hoạt hơn. Jenkins Controller cần mount volume /opt/devops/kube/.kube:/root/.kube (như trong docker-compose.yml) để kubectl hoạt động.
Bước 4: Cập nhật Jenkinsfile (Thêm Stage Deploy K8s)
Sửa lại Jenkinsfile trong project corejs.
// Jenkinsfile - Simple Deploy to Docker Host (Cách 1: All-in-One)
// Builds production images and runs them on the host Docker daemon.
pipeline {
    // Run on the Jenkins controller itself, requires docker-cli installed via Dockerfile
    agent any

    environment {
        REGISTRY_URL        = "registry.diendo.pro.vn"
        REGISTRY_CREDENTIAL = "docker-registry-creds"  // ID trùng với Jenkins

        // --- Application & Image Naming ---
        APP_NAME            = 'corejs' // Base name for images and containers
        FRONTEND_IMAGE      = "corejs/${APP_NAME}-frontend:latest" // Image name for frontend
        BACKEND_IMAGE       = "corejs/${APP_NAME}-backend:latest"  // Image name for backend
        FRONTEND_CONTAINER  = "${APP_NAME}-frontend-app" // Fixed container name for frontend
        BACKEND_CONTAINER   = "${APP_NAME}-backend-app"  // Fixed container name for backend

        // --- Host Port Configuration ---
        // Define ports on the Docker HOST machine where the containers will be accessible.
        // Make sure these ports (e.g., 8081, 5001) are free on your host.
        FRONTEND_HOST_PORT = 8081 // Access Frontend via http://<HOST_IP>:8081
        BACKEND_HOST_PORT  = 5001 // Access Backend via http://<HOST_IP>:5001

        // --- Docker Network ---
        // Specify the Docker network the containers should connect to (must exist)
        // DOCKER_NETWORK      = 'proxy_network'

        K8S_NAMESPACE     = 'corejs-prod'
        // K8S_CREDENTIAL_ID = 'k8s-cluster-config' // ID credential kubeconfig
        K8S_CREDENTIAL_ID = 'k8s-config-file' // ID credential kubeconfig
    }

    stages {
        // --- Stage 1: Get latest code ---
        stage('1. Checkout Code') {
            steps {
                // Use Jenkins built-in SCM checkout step
                checkout scm
                echo "SUCCESS: Code checked out from GitLab."
            }
        }

        // --- Stage 2: Build Production Docker Images ---
        stage('2. Build & Push Docker Images') {
            parallel {
                stage('Frontend') {
                    steps {
                        dir('frontend') {
                            echo "🔧 Building frontend image: ${FRONTEND_IMAGE}"
                            sh "docker build -t ${FRONTEND_IMAGE} ."
                        }
                        script {
                            withCredentials([usernamePassword(
                                credentialsId: env.REGISTRY_CREDENTIAL,
                                usernameVariable: 'REG_USER',
                                passwordVariable: 'REG_PASS')]
                                ) {
                                sh '''
                                    echo "${REG_PASS}" | docker login ${REGISTRY_URL} -u "${REG_USER}" --password-stdin
                                    docker tag ${FRONTEND_IMAGE} ${REGISTRY_URL}/corejs/${FRONTEND_IMAGE}
                                    docker push ${REGISTRY_URL}/${FRONTEND_IMAGE}
                                    docker logout ${REGISTRY_URL}
                                '''
                            }
                        }
                        echo "✅ Frontend image pushed successfully."
                    }
                }

                stage('Backend') {
                    steps {
                        dir('CoreAPI') {
                            echo "🔧 Building backend image: ${BACKEND_IMAGE}"
                            sh "docker build -t ${BACKEND_IMAGE} ."
                        }
                        script {
                            withCredentials([usernamePassword(
                                credentialsId: env.REGISTRY_CREDENTIAL,
                                usernameVariable: 'REG_USER',
                                passwordVariable: 'REG_PASS')]
                                ) {
                                sh '''
                                    echo "${REG_PASS}" | docker login ${REGISTRY_URL} -u "${REG_USER}" --password-stdin
                                    docker tag ${FRONTEND_IMAGE} ${REGISTRY_URL}/corejs/${FRONTEND_IMAGE}
                                    docker push ${REGISTRY_URL}/${BACKEND_IMAGE}
                                    docker logout ${REGISTRY_URL}
                                '''
                            }
                        }
                        echo "✅ Backend image pushed successfully."
                    }
                }
            }
        }

        // --- Stage 3: Manual Approval Gate ---
        stage('3. CTO Approval') {
            steps {
                // Pause the pipeline, waiting for manual input
                timeout(time: 1, unit: 'HOURS') {
                    input message: 'ACTION REQUIRED: Approve deployment to Production (Kubernetes Host)?',
                          ok: 'Proceed to Deploy',
                          submitter: 'cto' // Only user 'cto' can approve
                }
            }
        } // End Stage 3

        // --- Stage 3: Deploy Containers to Docker Host ---
        // stage('3. Deploy to Production (Docker Host)') {
        //     steps {
        //         echo "INFO: Approval received. Deploying containers to Docker Host..."

        //         // --- Stop and Remove Old Containers ---
        //         // Ensures a clean deployment by removing any previous versions
        //         // '|| true' prevents the pipeline from failing if the container doesn't exist
        //         echo "INFO: Stopping and removing old containers (if they exist)..."
        //         sh "docker stop ${env.FRONTEND_CONTAINER} || true"
        //         sh "docker rm ${env.FRONTEND_CONTAINER} || true"
        //         sh "docker stop ${env.BACKEND_CONTAINER} || true"
        //         sh "docker rm ${env.BACKEND_CONTAINER} || true"

        //         // --- Run New Backend Container ---
        //         echo "INFO: Starting new Backend container..."
        //         // Runs the container using the image built in Stage 2
        //         // -d: Run in detached (background) mode
        //         // --name: Assign a fixed, predictable name
        //         // -p HOST_PORT:CONTAINER_PORT : Map the host port to the container's internal port
        //         //    (Assumes the backend service listens on port 80 inside the container)
        //         // --network: Connect the container to the specified Docker network
        //         // --hostname: Set the hostname inside the container
        //         // --restart always: Ensure the container restarts if it stops or on host reboot
        //         //sh "docker run -d --name ${env.BACKEND_CONTAINER} -p ${env.BACKEND_HOST_PORT}:80 --network ${env.DOCKER_NETWORK} --hostname ${env.BACKEND_CONTAINER} --restart always ${env.BACKEND_IMAGE}"
        //         sh "docker run -d --name ${env.BACKEND_CONTAINER} -p ${env.BACKEND_HOST_PORT}:80 --hostname ${env.BACKEND_CONTAINER} ${env.BACKEND_IMAGE}"
        //         echo "SUCCESS: Backend container started."

        //         // --- Run New Frontend Container ---
        //          echo "INFO: Starting new Frontend container..."
        //         // Assumes the Nginx server inside the frontend image listens on port 80
        //         //sh "docker run -d --name ${env.FRONTEND_CONTAINER} -p ${env.FRONTEND_HOST_PORT}:80 --network ${env.DOCKER_NETWORK} --hostname ${env.FRONTEND_CONTAINER} --restart always ${env.FRONTEND_IMAGE}"
        //         sh "docker run -d --name ${env.FRONTEND_CONTAINER} -p ${env.FRONTEND_HOST_PORT}:80  --hostname ${env.FRONTEND_CONTAINER} ${env.FRONTEND_IMAGE}"
        //         echo "SUCCESS: Frontend container started."

        //         // --- Output Access Information ---
        //         echo "----------------------------------------------------"
        //         echo "✅ DEPLOYMENT COMPLETE!"
        //         echo "   Access Frontend at: http://<DOCKER_HOST_IP>:${env.FRONTEND_HOST_PORT}"
        //         echo "   Access Backend API at: http://<DOCKER_HOST_IP>:${env.BACKEND_HOST_PORT}"
        //         echo "----------------------------------------------------"
        //         echo "(Replace <DOCKER_HOST_IP> with your host's actual IP, e.g., 192.168.110.161)"
        //     }

        // } // End Stage 4
        // --- Stage 4: Deploy to Kubernetes ---
        stage('5. Deploy to Production (Kubernetes)') {
            steps {
                echo "INFO: Approval received. Deploying application to Kubernetes cluster..."
                script {
                    // Sử dụng Kubeconfig credential đã tạo
                    withKubeConfig(credentialsId: env.K8S_CREDENTIAL_ID) {

                        echo "INFO: Applying K8s manifests..."
                        // Chạy kubectl apply cho các file YAML (trong thư mục k8s của repo)
                        sh """
                        kubectl config view --minify
                        kubectl get nodes
                        kubectl apply -f k8s/namespace.yaml || true
                        kubectl apply -f k8s/registry-secret.yaml -n ${env.K8S_NAMESPACE} || true
                        kubectl apply -f k8s/backend-deployment.yaml -n ${env.K8S_NAMESPACE}
                        kubectl apply -f k8s/backend-service.yaml -n ${env.K8S_NAMESPACE}
                        kubectl apply -f k8s/frontend-deployment.yaml -n ${env.K8S_NAMESPACE}
                        kubectl apply -f k8s/frontend-service.yaml -n ${env.K8S_NAMESPACE}
                        """

                        echo "INFO: Waiting for deployments to roll out..."
                        // Chờ deployment hoàn tất
                        sh "kubectl rollout status deployment/corejs-frontend -n ${env.K8S_NAMESPACE}"
                        sh "kubectl rollout status deployment/corejs-backend -n ${env.K8S_NAMESPACE}"

                        // Lấy NodePort của service frontend
                        def nodePort = sh(
                            script: "kubectl get service corejs-frontend-svc -n ${env.K8S_NAMESPACE} -o=jsonpath='{.spec.ports[0].nodePort}'",
                            returnStdout: true
                        ).trim()

                        echo "----------------------------------------------------"
                        echo "✅ KUBERNETES DEPLOYMENT COMPLETE!"
                        echo "   Access Frontend at: http://:${nodePort}"
                        echo "----------------------------------------------------"
                        echo "(Replace  with the IP of any K8s node, e.g., 10.100.1.21)"
                    } // end withKubeconfig
                } // end script
            }
        } // End Stage 4 K8s

    } // End of stages

    // --- Post-build Actions ---
    // Actions to perform after the pipeline finishes
    post {
        always { // Always run these steps
            echo 'INFO: Pipeline finished execution.'
            // cleanWs() // Option to clean the Jenkins workspace
        }
        success { // Run only on success
            echo '✅ SUCCESS: Pipeline completed successfully!'
            // Add success notifications (email, Slack, etc.) here
        }
        failure { // Run only on failure
            echo '❌ FAILED: Pipeline failed!'
            // Add failure notifications here
        }
    } // End of post

} // End of pipeline
Push Jenkinsfile mới và thư mục k8s lên GitLab.
Bước 5: Chạy Pipeline và Truy cập Ứng dụng
Trigger pipeline (push code hoặc Build Now).
Phê duyệt ở Stage 3.
Stage 4 sẽ chạy kubectl apply.
Giai đoạn 6: Public hệ thống qua Zero trust của Cloudflare
Bước 1: Khởi tạo Zero Trust
- Truy cập https://one.dashboard.cloudflare.com
- Khởi tạo 1 Organization
- Add domain
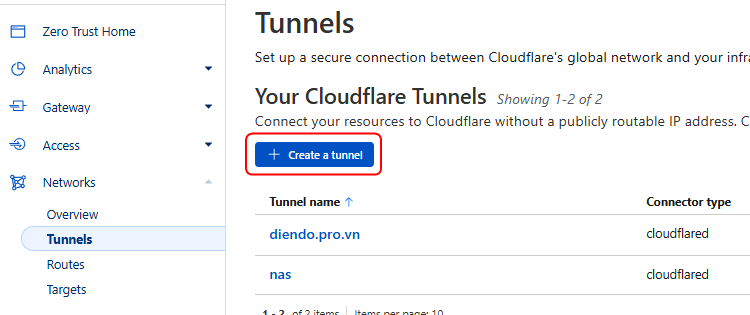
Bước 2: Tạo Tunnel
Vào mục Network -> Tunnels -> Create a tunnel
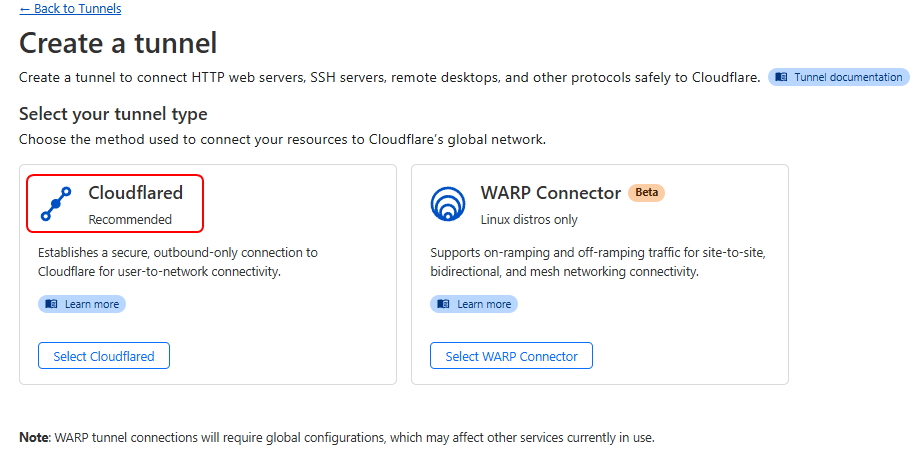
Chọn Cloudflared
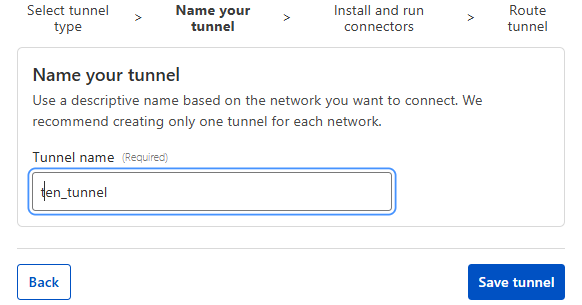
Nhập tên tunnel -> Save t
Tùy vào môi trường chọn môi trường để cài connector

Kiểm tra thấy tunnel HEALTHY là tunnel đã được kích hoạt
Bước 3: Public hệ thống
Vảo Network -> Tunnel -> Configure
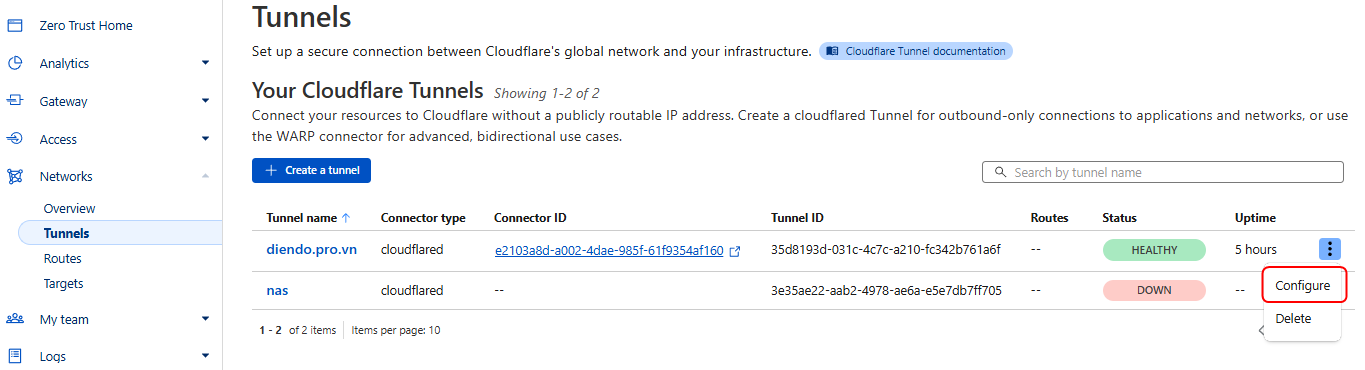
Chọn Published applcation routes
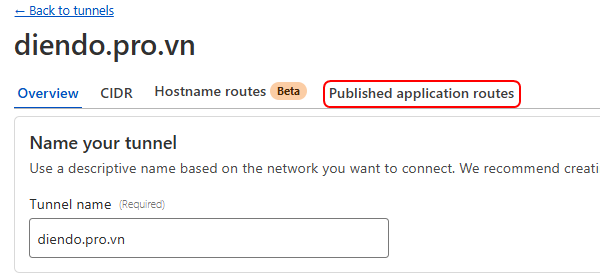
Add a published application route
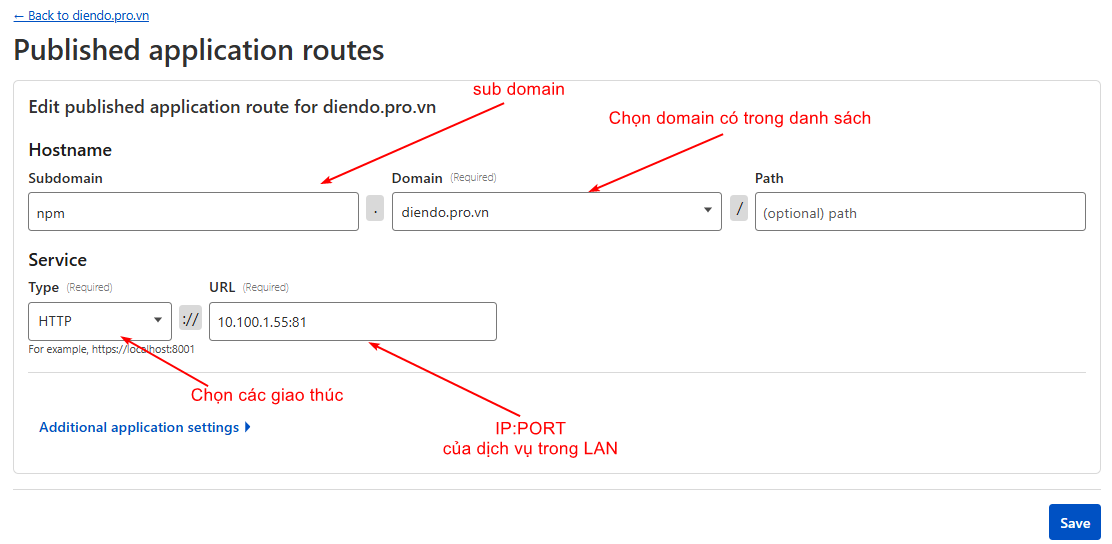
Nhập các thông tin cần thiết và SAVE
published 2 tên miền
– corejs.diendo.pro.vn -> Trỏ vào service k8s deploy frontend
– corejs-backend.diendo.pro.vn -> Trỏ vào service k8s deploy backend